

Have you ever wanted to capture the magical colors of the Northern Lights using just your smartphone? It might seem tricky, but with the right tips, you can take stunning photos that will amaze your friends and keep your memories alive.
Imagine holding your phone, snapping a perfect shot of those dancing lights, and sharing it instantly. Keep reading, and you’ll learn simple steps to make your smartphone photos shine as brightly as the Aurora itself. Your adventure in night photography starts here!
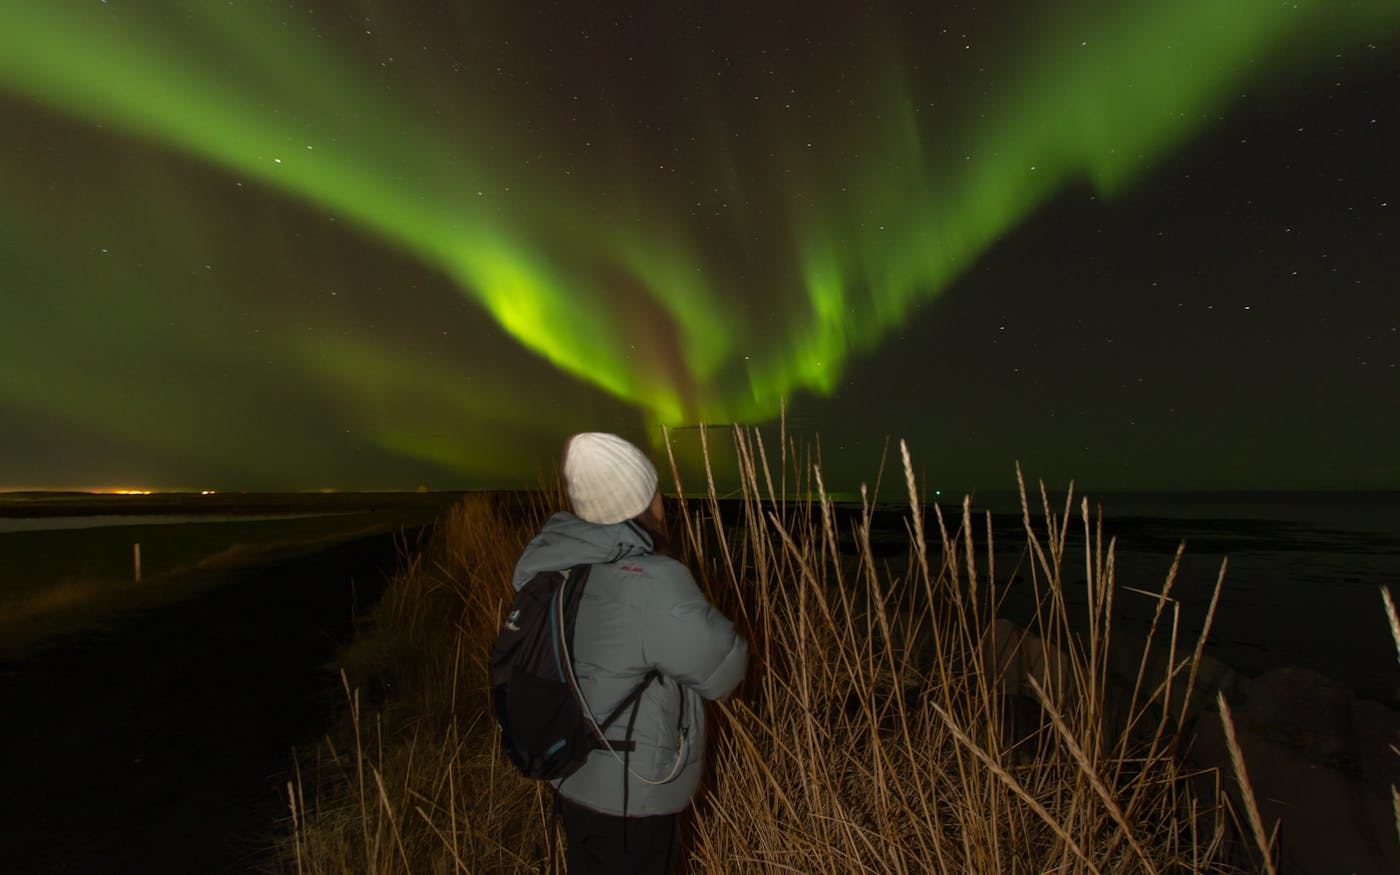
Credit: hello-aurora.com
Choosing The Right Smartphone
Choosing the right smartphone is key to capturing the Northern Lights well. Not all phones can take clear pictures in low light. The camera must handle darkness and show colors vividly. Some phones have special modes for night photography. Others have bigger sensors to catch more light. Picking a phone with the right features makes a big difference in your photos.
Camera Features To Look For
Look for smartphones with large camera sensors. Bigger sensors gather more light for clear shots. A wide aperture is important too. It lets more light into the lens. Night mode or long exposure settings help capture the aurora’s glow. Optical image stabilization reduces blur from shaky hands. A high ISO range allows better photos in dark places. Multiple lenses give more shooting options. Zoom lenses help frame the Northern Lights better.
Best Smartphone Models For Night Photography
Some smartphones stand out for night photos. Models with advanced night modes work well. Phones with larger sensors capture more light. Brands known for camera quality often perform better. Look for recent models with updated camera software. Phones with manual camera controls give you more options. Choosing a phone with these features ensures brighter, sharper Northern Lights pictures.
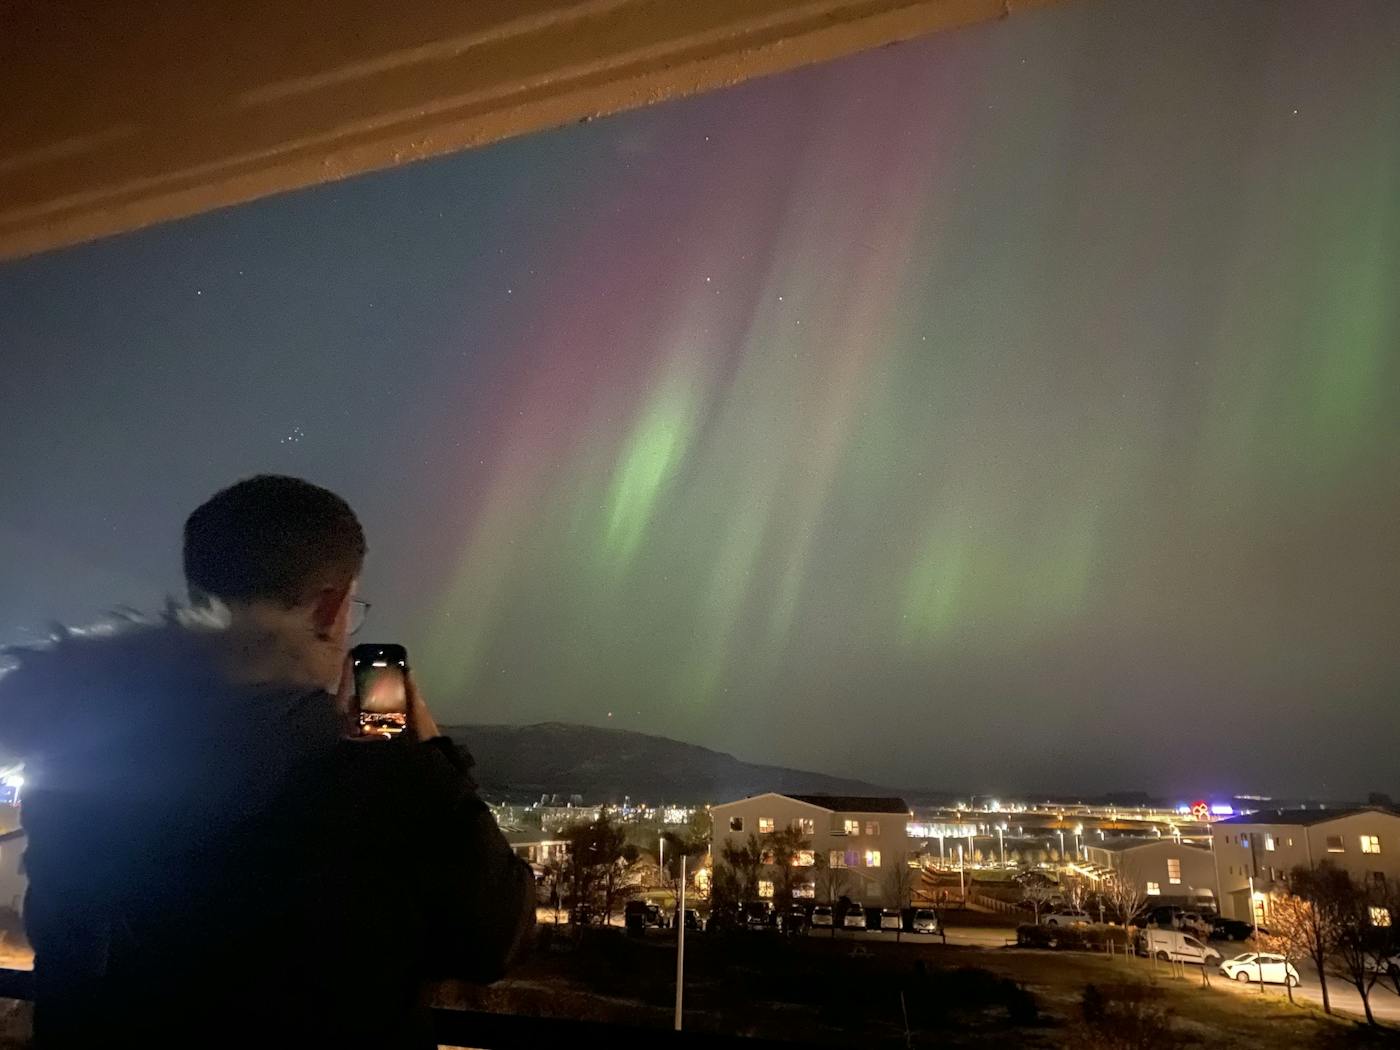
Credit: hello-aurora.com
Preparing For The Shoot
Preparing for a Northern Lights shoot with your smartphone is key to capturing great photos. Good preparation helps you avoid common problems. It also increases your chances of seeing the lights clearly.
Getting ready means checking the weather, finding the best spot, and choosing the right time. Each step plays a big role in your photo quality. Let’s explore these parts to help you get ready.
Checking Weather And Aurora Forecasts
Start by checking the weather forecast. Clear skies give the best view of the Northern Lights. Clouds can block the view and ruin photos.
Next, look at aurora forecasts. These show how strong the lights will be. Use apps or websites that update regularly. This helps you plan the best night to shoot.
Selecting The Perfect Location
Choose a dark place away from city lights. Light pollution makes the aurora hard to see and photograph. Parks, lakesides, or open fields work well.
Pick a safe spot with a clear view of the northern sky. Avoid trees or buildings that block your sight. A good location makes your photos sharper and brighter.
Timing Your Photos
The Northern Lights usually appear late at night. The best time is between 10 PM and 2 AM. Be patient. The lights can come and go quickly.
Stay outside for at least an hour. This increases your chances of catching the lights at their brightest. Dress warmly to stay comfortable during long waits.
Setting Up Your Smartphone Camera
Capturing the Northern Lights with a smartphone needs careful camera setup. The right settings help catch more light and detail. This section explains how to set your phone camera for the best shots. Follow simple steps to improve your photos under the dark sky.
Adjusting Exposure And Iso
Exposure controls how much light the camera sensor gets. Increase exposure time for brighter photos. ISO sets the sensor’s sensitivity to light. Higher ISO makes the image brighter but can add noise. Find a balance between brightness and clarity. Start with a low ISO and increase if the photo is too dark.
Using Manual Or Pro Mode
Manual or Pro Mode lets you control camera settings. It allows changing exposure, ISO, focus, and white balance. Use this mode to adjust settings for night sky photos. Automatic mode often fails in low light. Manual mode gives more control over your shot quality.
Enabling Long Exposure Settings
Long exposure keeps the camera shutter open longer. This captures more light from the Northern Lights. Use a timer or remote shutter to reduce shake. Hold the phone steady or use a tripod. Longer exposure times create brighter and clearer images of the aurora.
Stabilizing Your Phone
Taking clear pictures of the Northern Lights with a smartphone needs a steady hand. The lights move slowly, but even tiny shakes can blur your photo. Holding the phone still is very important. This section explains how to keep your phone stable for better shots.
Using Tripods And Supports
Tripods help hold your phone steady for long exposure shots. A small, portable tripod fits easily in your bag. Place your phone on the tripod and adjust it to face the sky. If you don’t have a tripod, use a flat surface like a rock or wall to rest your phone on. This support stops your phone from moving during the photo.
Avoiding Shake And Blur
Pressing the shutter button can cause phone shake. Use your phone’s timer or a remote shutter to avoid this. The timer delays the shot, so you can release your hand first. Keep your hands close to your body or lean on something solid to reduce movement. These small steps reduce blur and help capture sharp images of the Northern Lights.
Capturing The Northern Lights
Capturing the Northern Lights on your smartphone can be magical. It takes some patience and practice. With the right approach, your photos will show the colors and movement clearly. This guide helps you make the most of your phone’s camera for stunning shots.
Framing Your Shots
Start by choosing a clear view of the sky. Avoid bright city lights nearby. Include interesting foreground objects like trees or mountains. This adds depth to your photos. Keep the horizon straight to make pictures balanced. Use your phone’s grid lines to help frame the shot well.
Experimenting With Angles
Try different angles to find the best view. Tilt your phone upward to capture more sky. Shoot from low angles to include land shapes. Move around to find where the lights look strongest. Changing angles shows the lights in new ways. This keeps your photos fresh and exciting.
Taking Multiple Photos
Take many pictures in a row. The Northern Lights move quickly and change shape. Multiple shots increase your chance of catching perfect moments. Use burst mode if your phone has it. Review photos often and adjust settings if needed. This helps you capture bright, clear images every time.
Editing And Enhancing Photos
Editing and enhancing your Northern Lights photos can bring out their true beauty. Raw images from smartphones often look dull or dark. Simple edits help highlight the colors and details of the aurora. You can make your photos look more vibrant and clear.
Using Mobile Editing Apps
Many free and paid apps work well for editing photos. Choose apps like Snapseed, Lightroom, or VSCO. These apps offer easy tools to adjust light and color. They let you edit photos directly on your phone. No need for a computer or complicated software.
Adjusting Brightness And Contrast
Start by increasing the brightness slightly. This makes the Northern Lights more visible. Then, adjust the contrast to add depth. Higher contrast makes the colors stand out. Avoid too much brightness or contrast to keep the image natural.
Enhancing Colors Naturally
Boost the green, purple, and blue tones gently. This highlights the aurora’s natural glow. Use saturation and vibrance tools for this. Don’t overdo it to avoid fake-looking colors. Soft, natural colors keep the photo realistic and beautiful.
Tips For Better Results
Taking clear pictures of the Northern Lights with a smartphone needs some care. Small steps can help you get sharper and brighter images. These tips improve your chances of capturing the magic of the aurora.
Follow these simple methods to make your photos stand out. Your smartphone can do more than you think.
Keeping Your Lens Clean
A clean lens is key for clear photos. Dirt, dust, or fingerprints blur the image. Wipe your lens gently with a soft cloth before shooting. Avoid using rough materials that can scratch it. Check your lens often, especially in cold or windy places.
Conserving Battery Life
Cold weather drains your phone battery fast. Turn on airplane mode to save power. Lower screen brightness and close unused apps. Carry a portable charger for longer sessions. Keep your phone warm in your pocket when not shooting.
Practicing Patience And Persistence
Photographing the Northern Lights takes time. The lights can be faint or change quickly. Stay calm and keep your phone steady. Take many shots with different settings. The best photo might come after waiting a while.
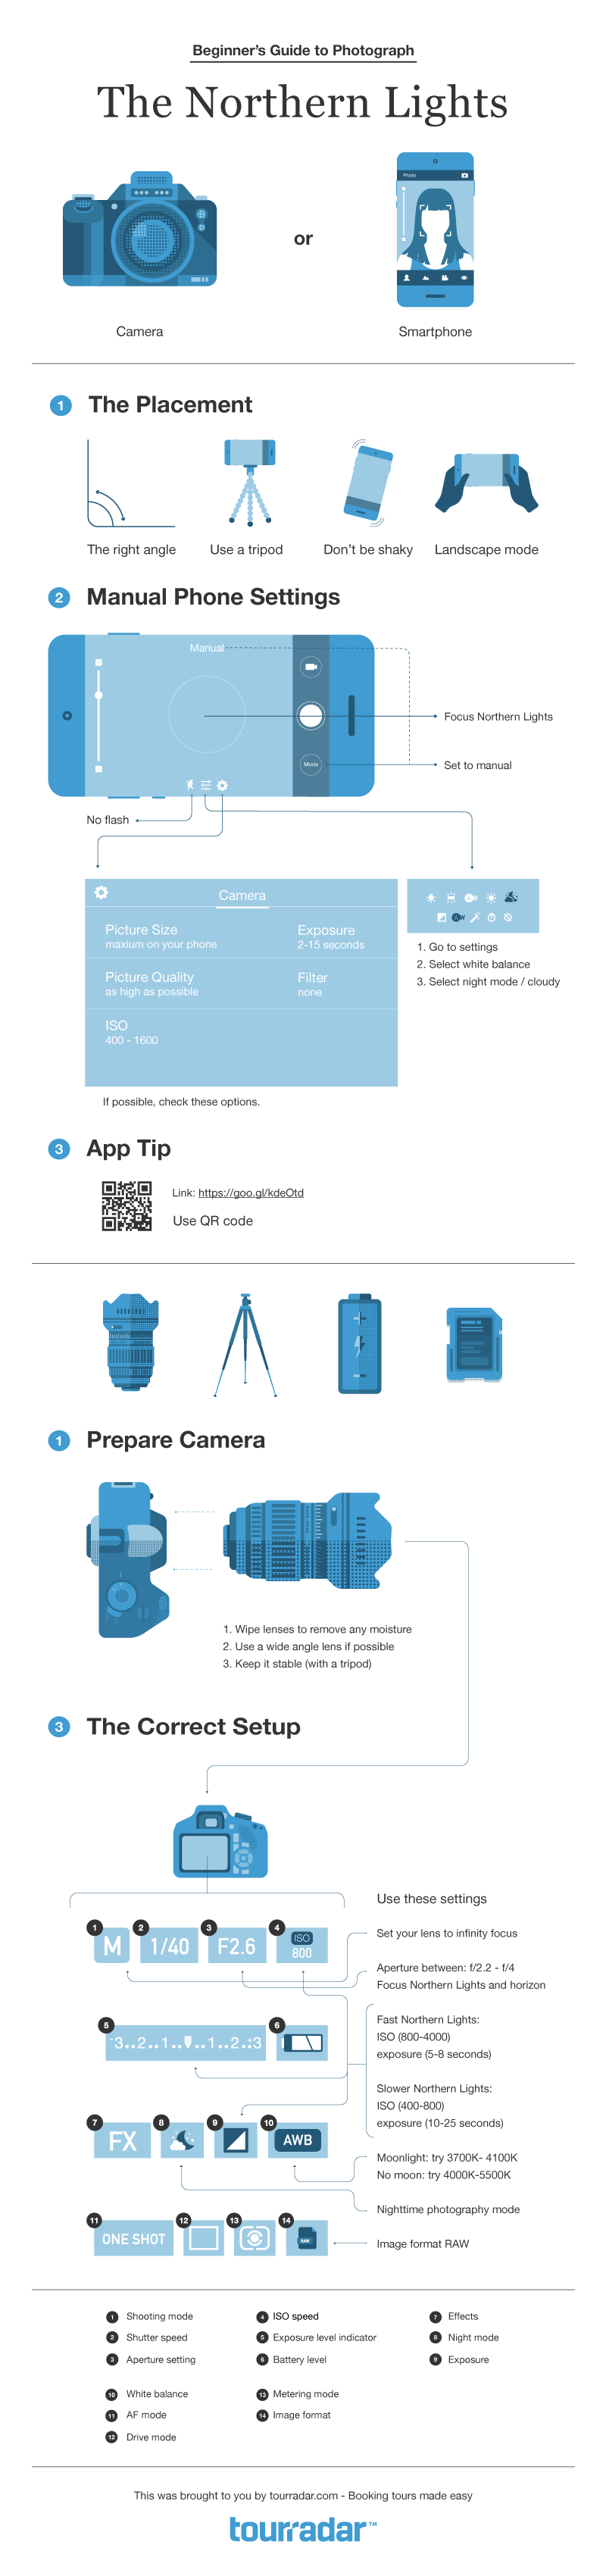
Credit: www.tourradar.com
Frequently Asked Questions
How Can I Capture Northern Lights With A Smartphone?
Use manual camera settings like ISO and exposure time. Stabilize your phone with a tripod. Shoot in RAW format for better editing.
What Smartphone Settings Work Best For Aurora Photography?
Set ISO between 800-3200, shutter speed 5-15 seconds, and focus manually to infinity. Turn off flash and use a timer.
Do I Need Special Apps To Photograph Northern Lights?
Yes, use apps that allow manual control of ISO, shutter speed, and focus. Examples include ProCam and NightCap Camera.
How Important Is Phone Stabilization For Northern Lights Photos?
Very important. A stable phone prevents blurry images during long exposures. Use a tripod or place the phone on a steady surface.
Conclusion
Capturing the Northern Lights with a smartphone takes patience and practice. Use a steady hand or tripod for clear shots. Adjust your camera settings for low light and long exposure. Find a dark place away from city lights. Remember, nature’s show can change fast—stay ready.
Enjoy the moment as much as the photo. With these tips, your smartphone can catch the magic of the Northern Lights. Keep trying, and you will improve each time. Happy shooting!
As an Amazon Associate, I earn from qualifying purchases.