

Are you ready to get the best sound from your speakers but not sure how to connect them with speaker wire? You’re in the right place.
Connecting your speakers the right way can make a huge difference in sound quality and overall performance. In this guide, you’ll discover simple steps to hook up your speakers quickly and correctly—no confusion, no guesswork. By the end, you’ll feel confident setting up your sound system like a pro.
Let’s dive in and make your audio experience truly amazing!
:max_bytes(150000):strip_icc()/connect-speakers-to-receiver-or-amp-3135120-0ebd3c8d2696473cb99bd8df9f4ce4be.png)
Credit: www.lifewire.com
Choosing The Right Speaker Wire
Choosing the right speaker wire is key to great sound. The wire must fit your speakers and setup perfectly. The right wire helps sound travel clearly without loss. Several factors affect your choice, including wire thickness, length, and material quality. Understanding these points ensures your speakers perform well.
Gauge And Length Considerations
Speaker wire gauge means its thickness. Lower gauge numbers mean thicker wire. Thicker wire carries sound better over longer distances. For short runs under 25 feet, 16-gauge wire works fine. Longer runs over 50 feet need 14-gauge or thicker wire. Too thin wire causes sound loss and weak bass.
Length matters too. Measure the distance from the amplifier to the speaker. Add some extra length for flexibility and placement. Avoid wires that are too long to prevent signal loss.
Types Of Speaker Wire
Most speaker wire has two conductors, usually copper. Copper is common because it conducts sound well. Some wires use copper-clad aluminum, which costs less but conducts worse. Pure copper wire is best for clear sound. Another type is oxygen-free copper, which resists corrosion better.
Wire insulation also varies. PVC is cheap and common. Rubber insulation is more flexible and durable. Choose wire with insulation that suits your setup and environment.
Quality And Material Factors
Good material improves sound quality and wire life. Copper is preferred for its high conductivity. Silver offers better conduction but costs more and is rare for home use. Avoid cheap wire with poor metal content.
Check the wire strands. More strands mean better flexibility and durability. Solid core wires are less flexible but stable. Quality insulation prevents damage and signal interference. Look for wires with clear labels and good reviews.

Credit: soundcertified.com
Preparing The Speaker Wire
Preparing the speaker wire is an important step before connecting your speakers. Proper preparation helps ensure a strong and clear audio signal. It also prevents damage to your equipment and keeps connections safe.
Taking time to prepare the wire carefully makes the setup process easier. It also improves sound quality and the durability of your connections.
Measuring And Cutting Wire
Start by measuring the distance from your speaker to the amplifier or receiver. Add a few extra inches to allow for movement or repositioning. Use wire cutters to cut the speaker wire to the right length. Make sure the cut is clean and straight for a good connection.
Stripping The Wire Ends
Use a wire stripper tool to remove about half an inch of the outer insulation from both ends of the wire. Be careful not to cut the thin copper strands inside. Exposing the copper allows the wire to connect well with the speaker terminals and amplifier.
Twisting And Tinning Wires
Twist the exposed copper strands tightly to keep them together. This prevents stray wires that can cause short circuits. For extra protection, you can tin the wire ends by applying a small amount of solder. Tinning makes the wire firmer and improves the connection quality.
Connecting To The Speaker
Connecting speaker wire to your speaker is an important step. It ensures clear sound and prevents damage to your equipment. This process is simple but needs care to avoid mistakes. Below are key steps to connect your speaker wire properly and safely.
Identifying Positive And Negative Terminals
Speakers have two terminals: positive and negative. They are often marked with “+” and “−” signs. The positive terminal may be red, and the negative one is usually black. Matching these correctly is important for good sound quality. Connect the positive wire to the positive terminal and the negative wire to the negative terminal.
Attaching Wire To Binding Posts
Binding posts are common on many speakers. To attach wire, first loosen the post by turning it counterclockwise. Insert the bare wire or wire with a connector into the hole or wrap it around the post. Tighten the post by turning it clockwise to secure the wire. Make sure the wire is firmly in place without any loose strands.
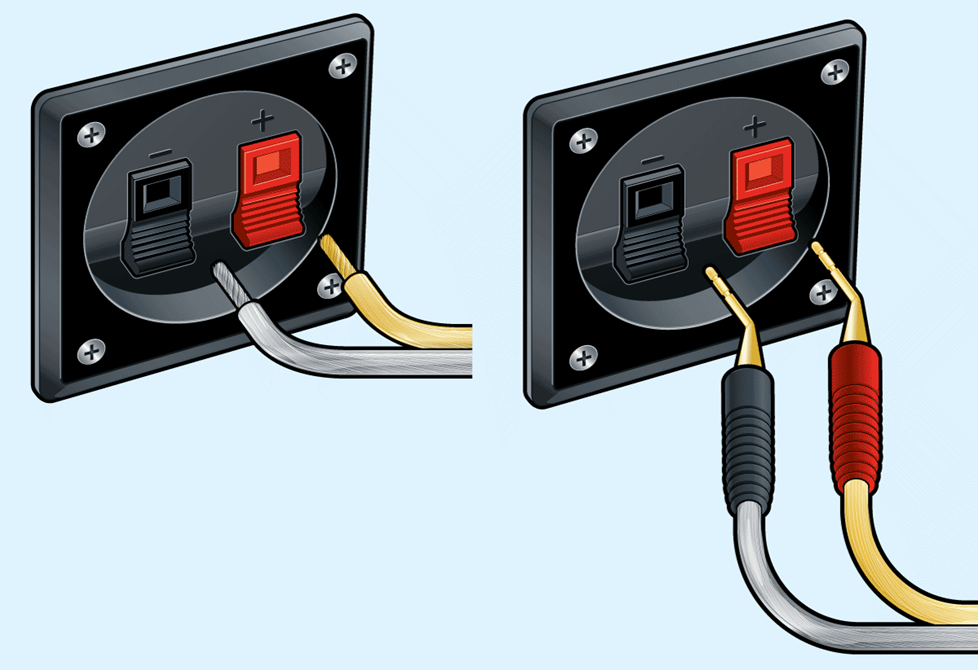
Using Spring Clips And Banana Plugs
Spring clips are simple to use. Press the clip to open the slot, insert the bare wire, and release. The clip holds the wire in place. Banana plugs are connectors that make attaching easier. Insert the wire into the plug, then push the plug into the speaker’s terminal. Banana plugs offer a secure and clean connection.
Connecting To The Amplifier Or Receiver
Connecting your speakers to an amplifier or receiver is a key step in setting up your sound system. This connection sends the audio signal from the amplifier to the speakers. Proper connections ensure clear sound and prevent damage to your equipment. Follow simple steps to make these connections safe and effective.
Locating Speaker Outputs
Look at the back of your amplifier or receiver. You will see several ports labeled “Speaker Out” or similar. Each output corresponds to a speaker channel, such as front left or right. Identify the correct output for each speaker. Use the labels to avoid confusion. Some amplifiers have color-coded terminals for easy matching.
Matching Wire Polarity
Speaker wires have two conductors: positive and negative. Usually, one side has a marking or red color. Connect the positive wire to the red terminal on the amplifier. Connect the negative wire to the black terminal. Matching polarity keeps the speakers in phase. It prevents weak or distorted sound. Always keep the same polarity on both ends of the wire.
Securing Connections
Strip a small section of insulation from each wire end. Insert the bare wire into the amplifier terminal or binding post. Tighten the terminal or screw to hold the wire firmly. Make sure no stray wires touch other terminals. Loose connections cause sound issues and may damage equipment. Double-check each connection for security and neatness.
Testing The Setup
Testing the setup is a key step after connecting your speakers with speaker wire. This step ensures everything works well and sounds clear. It helps find any issues early and fix them fast. Follow simple tests to make sure your speakers deliver the best sound.
Powering On And Volume Check
Start by turning on your amplifier or receiver. Gradually increase the volume from low to moderate. Listen carefully for any sound from the speakers. Make sure both speakers produce sound without crackling or buzzing. If no sound appears, double-check wire connections for tightness.
Troubleshooting Common Issues
No sound or weak sound may mean loose wires or wrong connections. Check that the positive and negative wires match on both ends. Swap speaker wires to isolate faulty cables. Inspect wires for damage or breaks. Replace any damaged wire to restore sound quality.
Optimizing Sound Quality
Place speakers correctly for balanced sound. Avoid placing speakers too close to walls or corners. Adjust the volume and tone controls on your amplifier. Use test tracks with clear voices and instruments. Fine-tune settings until the sound feels natural and clear.
Credit: www.crutchfield.com
Maintaining Speaker Wire Connections
Maintaining speaker wire connections ensures clear sound and prevents damage. Regular care helps keep your audio system working well. Simple steps can improve sound quality and extend wire life.
Regular Inspection
Check speaker wires often for signs of wear or damage. Look for cracks, frays, or exposed wire strands. Inspect both ends of the wire, where it connects to the speaker and the amplifier. Early detection stops bigger problems later.
Cleaning And Tightening
Dust and dirt can weaken wire connections. Clean contacts gently with a soft cloth or brush. Avoid using water or harsh chemicals. Tighten loose connections to prevent sound dropouts. Loose wires cause crackling or no sound at all.
Upgrading Wire For Better Performance
Old or thin wires limit audio quality. Choose thicker wire with lower resistance for better sound. Copper wires provide good conductivity and durability. Upgrading wire can improve bass and clarity. Match the wire length to avoid signal loss.
Frequently Asked Questions
How Do I Connect Speaker Wire To Speakers?
Strip about half an inch of insulation from the wire ends. Connect the positive wire to the red terminal and the negative wire to the black terminal on the speaker. Ensure a secure and tight connection to avoid sound issues.
What Gauge Speaker Wire Should I Use?
Use 16-gauge wire for most home audio setups under 50 feet. For longer distances or higher power, opt for 14-gauge wire to reduce signal loss and maintain sound quality.
Can I Connect Speakers In Series Or Parallel?
Yes, you can connect speakers in series or parallel. Series increases impedance, while parallel lowers it. Choose the method based on your amplifier’s specifications to avoid damage.
How Do I Identify Positive And Negative Speaker Wires?
Typically, the positive wire is marked with a red stripe or a plus sign. The negative wire is plain or marked with a black stripe or minus sign. Correct identification ensures proper speaker polarity and sound quality.
Conclusion
Connecting speakers with wire is simple and clear. Match the positive and negative terminals carefully. Use the right wire size for better sound quality. Keep wires tight and avoid loose connections. Test the sound after setup to ensure it works well.
This way, your speakers will deliver great audio every time. Enjoy your music or movies with clear, strong sound. Easy steps lead to better listening experiences. Just follow the guide, and you’re all set.
As an Amazon Associate, I earn from qualifying purchases.

