

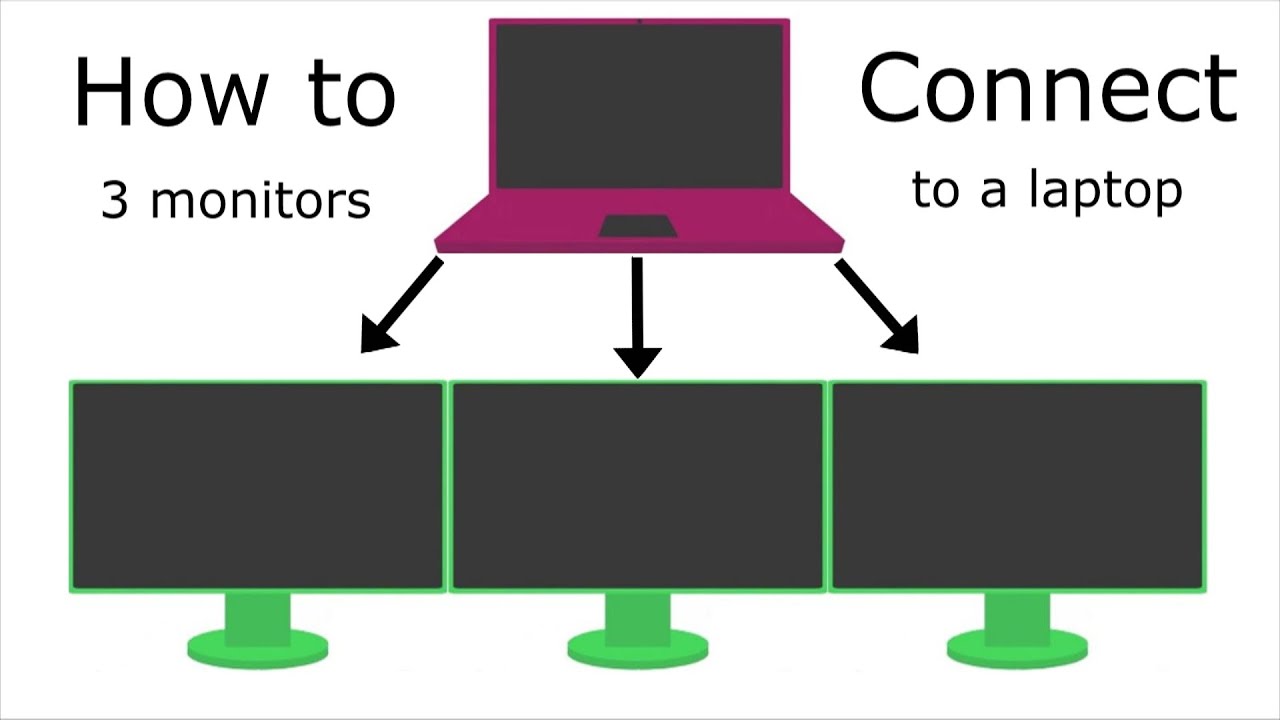
Want to boost your productivity or create an immersive gaming setup? Adding a third monitor can make a huge difference.
But if you’re unsure how to connect that extra screen, you’re not alone. This guide will walk you through simple steps to get your third monitor up and running quickly. By the end, you’ll have the space you need to work smarter, play better, or enjoy multitasking like a pro.
Keep reading to unlock the full potential of your computer setup!

Credit: community.frame.work
Check Your Hardware Compatibility
Before connecting a third monitor, check your hardware compatibility. This step helps avoid connection issues and ensures smooth display performance. Knowing your hardware limits saves time and frustration.
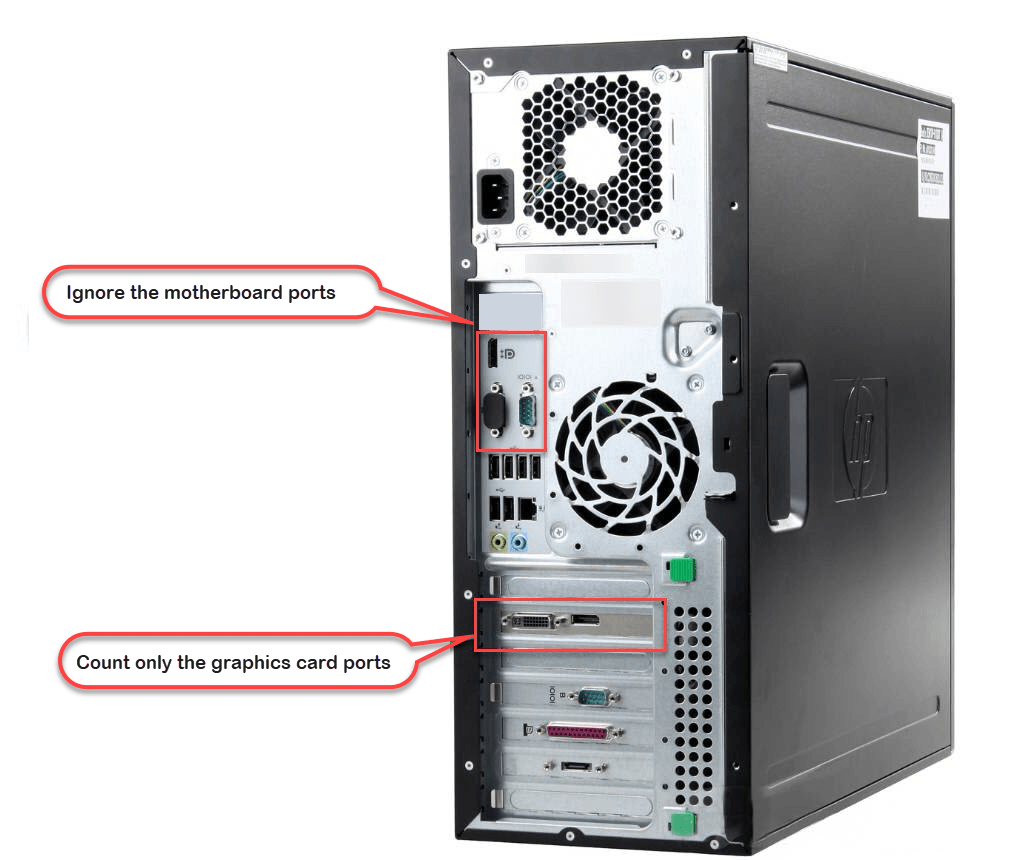
Identify Available Ports
Look at your computer’s back and sides to find video ports. Common ports include HDMI, DisplayPort, VGA, and DVI. Count how many ports are free for the new monitor. Some laptops may need adapters for extra screens.
Verify Graphics Card Support
Check if your graphics card supports three monitors. Visit the manufacturer’s website or check your system settings. Older or basic graphics cards may support only two screens. Upgrading might be necessary for three displays.
Assess Monitor Specifications
Review the third monitor’s input options. Match the monitor’s ports with your computer’s available ports. Confirm the monitor resolution and refresh rate compatibility. This ensures the best picture quality and smooth operation.
Choose The Right Connection Type
Choosing the right connection type is key for adding a third monitor. Each type works differently and affects screen quality and speed. Picking the right one helps avoid problems like flickering or no display. It also ensures your setup runs smoothly and looks great.
Hdmi Vs Displayport Vs Vga
HDMI and DisplayPort offer clear and sharp images. They both carry sound and video through one cable. DisplayPort often supports higher resolutions and refresh rates than HDMI. VGA is older and uses analog signals, which can lower picture quality. For best results, use HDMI or DisplayPort over VGA.
Using Usb-c Or Thunderbolt
USB-C and Thunderbolt are newer connections. They can send data, video, and power using one cable. Many modern laptops support USB-C or Thunderbolt for monitors. These connections allow fast data transfer and high-resolution displays. Check if your device supports these ports for a clean setup.
Adapters And Converters
Adapters change one connection type to another. For example, USB-C to HDMI or DisplayPort to VGA. They help connect devices with different ports. Not all adapters support high resolutions, so choose carefully. Using quality adapters avoids signal loss and display issues.
Prepare Your Workspace
Preparing your workspace is the first step to connect a third monitor smoothly. A well-organized space helps you avoid confusion and saves time. It also ensures that your new setup looks clean and works well.
Arrange Monitor Placement
Place your monitors so you can see all screens easily. Make sure they are at eye level to reduce neck strain. Leave some space between each monitor for a clear view. Arrange them in a way that fits your desk size and work style.
Manage Cables Effectively
Keep your cables neat to avoid tangles and clutter. Use cable ties or clips to hold cables together. Label each cable to know which device it belongs to. Running cables behind the desk creates a tidy look and frees desk space.
Ensure Proper Power Supply
Check that you have enough power outlets for all monitors. Use a surge protector to protect your devices from power spikes. Avoid overloading power strips to prevent hazards. Keep power cords away from walkways for safety.
Credit: www.drivereasy.com
Connect And Configure Displays
Connecting and configuring a third monitor helps expand your workspace. It improves productivity and makes multitasking easier. Setting up the display properly ensures clear visuals and smooth operation.
This section guides you through the steps to connect and adjust your third screen. Follow the instructions for your operating system to get the best results.
Plugging In The Third Monitor
Start by turning off your computer. Locate the video ports on your PC or laptop. Common ports include HDMI, DisplayPort, VGA, or USB-C.
Connect the third monitor’s cable to an available port. Secure the connection firmly. Turn on the monitor and then power up your computer.
Your system should detect the new display automatically. If not, check the cable and port for any issues.
Adjusting Display Settings On Windows
Open the Settings app by pressing Windows + I. Go to System and then select Display. You will see all connected monitors listed.
Click on the third monitor icon. Choose “Extend desktop” to use it as extra workspace. Drag the monitor icons to match your physical setup.
Set the resolution for the third monitor. Click Apply to save changes. This step ensures the screen looks sharp and clear.
Adjusting Display Settings On Mac
Open System Preferences from the Apple menu. Click on Displays, then select the Arrangement tab. Your Mac shows all connected monitors here.
Drag the displays to align their position. Check the “Mirror Displays” box only if you want the same screen on all monitors. Uncheck it to extend the desktop.
Choose the best resolution under the Display tab. This setting makes sure text and images appear crisp on the third screen.
Calibrating Color And Resolution
Open your display’s menu using buttons on the monitor. Adjust brightness, contrast, and color temperature to your liking.
Use your computer’s color calibration tool for precise settings. On Windows, search for “Color Calibration” in the Start menu.
On Mac, open System Preferences and select Displays, then Color. Follow the calibration wizard to improve color accuracy.
Set the resolution to match the monitor’s native specs. This avoids blurry or stretched images on the third screen.
Troubleshoot Common Issues
Connecting a third monitor can improve your workspace and productivity. Sometimes issues occur during setup. Troubleshooting helps solve common problems fast. This section covers frequent problems and easy fixes. Follow these tips to get your third monitor working smoothly.
Monitor Not Detected
Sometimes your computer does not see the third monitor. Check the cable connections first. Make sure the cables are fully plugged in. Try using a different cable or port. Restart your computer to refresh the display settings. Open the display settings and click “Detect” to find the monitor. Update your graphics driver to the latest version. This often fixes detection issues.
Display Flickering Or Resolution Problems
Flickering screens or blurry images reduce comfort. Check the monitor’s refresh rate in display settings. Set it to the recommended value for your monitor. Verify the resolution matches the monitor’s native display. Wrong resolution causes blurry or stretched images. Try changing cables if flickering continues. Avoid using adapters that lower signal quality.
Performance And Lag Concerns
Adding a third monitor can slow your system. Close unnecessary programs to free up resources. Check your graphics card supports three monitors. Lower the resolution or refresh rate to improve speed. Adjust power settings for better performance. Using a docking station may cause delays; try connecting directly to the PC. Keep your system updated for smooth operation.
Credit: www.youtube.com
Optimize Multi-monitor Setup
Optimizing a multi-monitor setup improves comfort and work speed. It helps organize your digital workspace clearly. Proper setup reduces eye strain and boosts focus. Small changes make a big difference in daily tasks.
Arrange Screens For Productivity
Place your main screen directly in front. Set secondary monitors on each side. Match screen height for easy eye movement. Align screens to reduce neck turning. Arrange them by task importance and frequency. This layout saves time and effort.
Use Software Tools For Management
Use software to control window placement. Tools like DisplayFusion or Windows Snap help. They keep apps organized across screens. Set rules for where apps open. These tools simplify multitasking and reduce clutter.
Adjust Power Settings For Efficiency
Change power options to save energy. Set monitors to sleep after inactivity. Lower brightness to reduce eye fatigue. Use energy-saving modes on all screens. This extends device life and cuts power bills.
Frequently Asked Questions
How Do I Connect A Third Monitor To My Pc?
To connect a third monitor, ensure your PC has enough video ports. Use HDMI, DisplayPort, or VGA. Install necessary drivers and configure display settings in your operating system for proper multi-monitor setup.
What Hardware Is Needed For A Third Monitor Connection?
You need a compatible graphics card with three video outputs or use a USB to HDMI adapter. Also, ensure the monitor supports your PC’s video ports for seamless connectivity.
Can I Use Different Monitor Types For The Third Screen?
Yes, you can mix different monitor types and brands. The key is ensuring compatibility with your PC’s video outputs and adjusting settings for resolution and orientation.
How To Troubleshoot If The Third Monitor Isn’t Detected?
Check cable connections, update your graphics drivers, and verify display settings. Restart your PC and try a different port or adapter if the monitor remains undetected.
Conclusion
Connecting a third monitor can boost your work and entertainment space. Choose the right cables and ports for your devices. Check your computer settings to arrange screens properly. Keep drivers updated for smooth performance. Test the setup before you start using it fully.
With patience, your triple monitor setup will work well. Enjoy the extra screen space every day.
As an Amazon Associate, I earn from qualifying purchases.

