

Are you looking to take your Discord video calls to the next level? Using OBS Virtual Camera can help you do just that by allowing you to share custom video feeds, overlays, and effects during your chats.
Imagine surprising your friends with dynamic backgrounds or adding professional-looking visuals to your streams—all from your own computer. In this guide, you’ll learn exactly how to set up and use OBS Virtual Camera on Discord, step by step. Keep reading to unlock new creative possibilities for your video calls!
Setting Up Obs Virtual Camera
Setting up the OBS Virtual Camera is the first step to use your custom video on Discord. The process is simple and takes only a few minutes. Follow these clear steps to get your virtual camera working smoothly.
Installing Obs Studio
Start by downloading OBS Studio from the official website. Choose the version that matches your computer’s operating system. Install the program by following the on-screen instructions. After installation, open OBS Studio to begin setup.
Enabling Virtual Camera Feature
In OBS Studio, find the “Controls” panel on the right side. Click on the “Start Virtual Camera” button. This action activates the virtual camera. You can now use OBS as a video source in other apps like Discord.
Configuring Video Settings
Adjust your video settings in OBS before using the virtual camera. Go to “Settings” and select the “Video” tab. Set the base resolution and output resolution to match your screen or camera. Choose a frame rate that fits your needs, usually 30 FPS works well.
Credit: www.fineshare.com
Preparing Obs Scenes For Discord
Preparing OBS scenes for Discord is a key step to share your video and audio smoothly. A well-set scene helps you control what others see and hear. You can add your camera, game, or other video sources easily. Setting up the scene right makes your stream clear and neat.
This guide shows how to create and customize scenes in OBS. Follow these steps to get your content ready for Discord.
Creating A New Scene
Open OBS and find the Scenes box at the bottom left. Click the plus (+) button to add a new scene. Give your scene a simple name. This helps you find it quickly later. Your new scene is now ready to add sources.
Adding Video And Audio Sources
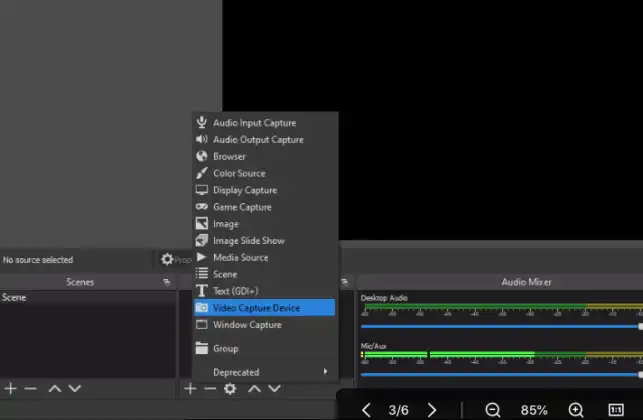
Click the plus (+) in the Sources box next to Scenes. Choose the source type you want, like Video Capture Device for your webcam. Select the device and press OK. Add audio sources by selecting Audio Input Capture. Pick your microphone or system sound. You can add multiple sources to one scene.
Customizing Layouts
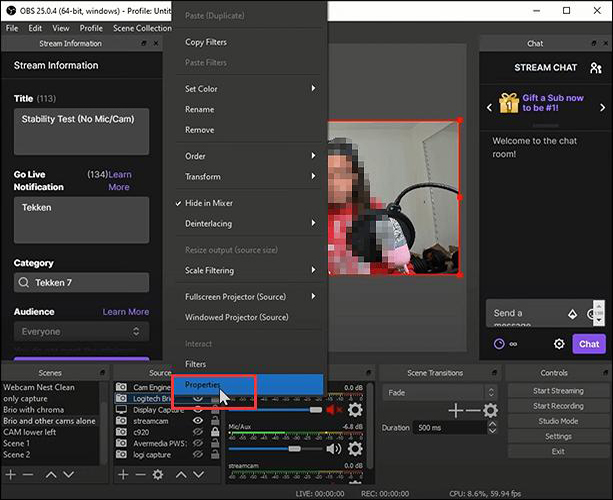
Drag and resize each source in the preview window. Arrange your webcam, game, or images as you like. Use the red border to adjust size. Right-click a source for more options like filters or cropping. Keep your layout simple and clear. This makes your stream look professional on Discord.
Connecting Obs To Discord
Connecting OBS to Discord lets you share your customized video easily. OBS Virtual Camera acts like a webcam source inside Discord. This way, you can stream scenes, overlays, and more during calls or streams.
Setting up the connection is simple and quick. Follow the steps below to select OBS Virtual Camera and adjust settings for the best video quality. Testing your setup ensures everything works smoothly before you go live.
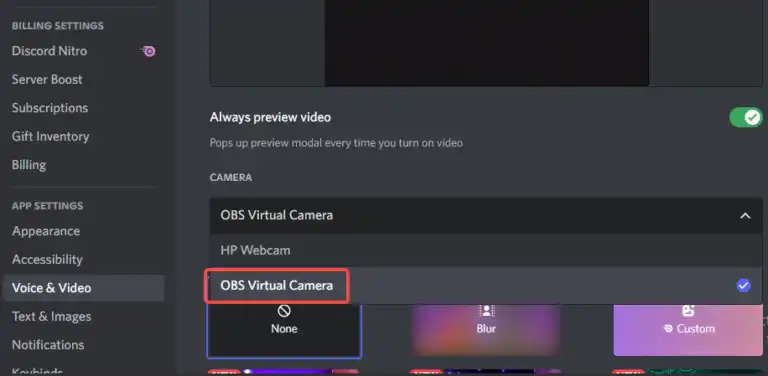
Selecting Obs Virtual Camera In Discord
Open Discord and go to User Settings. Find the Video & Voice section under App Settings. Click the Video Camera drop-down menu. Choose “OBS Virtual Camera” as your video device. This connects your OBS output to Discord.
If you do not see OBS Virtual Camera, make sure OBS is running with the Virtual Camera enabled. Restart Discord if needed to refresh available camera options.
Adjusting Discord Video Settings
After selecting OBS Virtual Camera, adjust your video settings in Discord. Set the video resolution to match your OBS output. Check the frame rate for smooth video. Lower settings help if your internet is slow.
Turn off any video filters in Discord that may affect OBS output. Also, disable hardware acceleration in Discord to prevent video lag. These changes improve your video quality during calls.
Testing Your Setup
Start a test call or join a voice channel with video. Check how your OBS scenes appear in Discord. Move between scenes to see if the video updates correctly. Ask friends to confirm your video looks good on their end.
If you notice lag or poor quality, revisit your OBS and Discord settings. Make small changes and test again until your video runs smoothly. Testing avoids surprises during important calls or streams.
Troubleshooting Common Issues
Troubleshooting common issues with OBS Virtual Camera on Discord helps keep your video calls smooth. Many users face simple problems that block the virtual camera from working correctly. This section covers typical errors and easy fixes. You will learn how to solve the most frequent challenges fast.
Virtual Camera Not Showing Up
Sometimes, the OBS Virtual Camera does not appear as a camera option on Discord. Check if the OBS Virtual Camera plugin is installed and running. Restart both OBS and Discord to refresh the connection. Make sure no other apps use the camera at the same time. Update OBS to the latest version to avoid compatibility issues. Running Discord as an administrator can help recognize the virtual camera.
Audio Sync Problems
Audio and video may not sync well during a virtual camera stream. Verify that your microphone and audio sources are correctly set in OBS. Lowering the video resolution can reduce delay. Use the “Sync Offset” feature in OBS to adjust audio timing. Close programs that use high CPU, which can cause lag. Keep your PC’s sound drivers updated for better performance.
Performance Optimization Tips
Lagging or choppy video affects the call quality. Lower OBS output resolution and frame rate to reduce CPU load. Use hardware encoding if your PC supports it. Close unnecessary apps running in the background. Update your graphics card drivers regularly. Set OBS priority to high in the task manager. Check your internet speed, as slow connections impact virtual camera quality.
Advanced Tips For Better Streaming
Advanced streaming techniques help improve your Discord broadcasts using OBS Virtual Camera. These tips make your stream look professional and keep viewers interested. Small changes can create a big difference in your stream quality.
Using Filters And Effects
Filters can change your video’s look and feel instantly. Use color correction to brighten or darken your image. Add a chroma key filter to replace your background. Blur effects help hide messy rooms. These options make your stream more visually appealing.
Switching Scenes On The Fly
Create different scenes for various parts of your stream. Switch between them quickly using hotkeys or the OBS interface. For example, show your gameplay, then switch to your face cam during breaks. Smooth scene changes keep viewers focused and entertained.
Integrating Chat And Alerts
Add chat windows and alert boxes to your stream. This shows messages and notifications in real time. It helps viewers feel connected and engaged. Use OBS sources to add these elements easily. Keep alerts clear and not too distracting.
Credit: edimakor.hitpaw.com
Credit: www.fineshare.com
Frequently Asked Questions
How Do I Set Up Obs Virtual Camera For Discord?
First, install OBS Studio with the Virtual Camera plugin. Open OBS, start the Virtual Camera, then select “OBS Virtual Camera” as your video source in Discord settings.
Can I Use Obs Virtual Camera On Discord Mobile?
No, Discord mobile does not support OBS Virtual Camera. It is only compatible with Discord’s desktop version on Windows or macOS.
Why Is Obs Virtual Camera Not Showing On Discord?
Ensure OBS Virtual Camera is running before opening Discord. Also, update both OBS Studio and Discord to the latest versions to fix compatibility issues.
How To Improve Video Quality Using Obs Virtual Camera On Discord?
Adjust the resolution and frame rate in OBS settings. Use good lighting and a quality webcam for clearer, smoother video during Discord calls.
Conclusion
Using OBS Virtual Camera on Discord adds creativity to your video chats. It lets you share custom scenes and effects easily. Just follow the setup steps carefully. Test your camera before joining calls to avoid issues. This tool makes online meetings and streams more fun and personal.
Keep practicing to improve your skills. Enjoy sharing your unique content with friends or colleagues.
As an Amazon Associate, I earn from qualifying purchases.
