Are you struggling to get your microphone working on your computer? Whether you need it for calls, gaming, or recording, a faulty mic can be frustrating.
But don’t worry—testing your mic is easier than you think. You’ll learn simple, step-by-step ways to check if your mic is working properly. By the end, you’ll know exactly how to fix common problems and get clear sound every time.
Keep reading to make sure your voice is heard loud and clear!
Check Microphone Connection
Checking the microphone connection is the first step to test your mic on a computer. A loose or wrong connection can stop your mic from working. This step helps you find simple connection problems fast. Fixing these can save time and avoid confusion later.
Start by looking at how your microphone connects to your computer. Small mistakes here can cause big issues with sound input.
Verify Physical Plug-in
Make sure your microphone plug is fully inserted into the jack. A half-plugged mic will not work properly. Push the plug gently but firmly until it stops. Check both ends of the cable to be sure they are secure.
Use Correct Port
Microphones need to connect to the right port on your computer. Look for a pink or red jack for microphones. Using a headphone port or a USB port for a jack mic will cause problems. USB mics must be plugged into USB ports only. Match your mic type with the right port to avoid errors.
Inspect Cable And Hardware
Look at the microphone cable for cuts or damage. Broken wires inside can stop sound from reaching the computer. Also, check the mic itself for cracks or loose parts. Test with a different cable or mic to find out if the problem is hardware-related.
Set Microphone As Default Device
Setting your microphone as the default device is important for clear audio input. This ensures your computer uses the correct mic during calls and recordings. Without this step, the system might select a different device, causing issues. Follow simple steps to make your mic the main input source.
Access Sound Settings
Click the Start menu and open Settings. Select the “System” option, then click “Sound.” This opens the sound settings panel. Here, you can manage all audio devices on your computer.
Select Input Device
Scroll to the “Input” section in Sound settings. Click the dropdown menu under “Choose your input device.” Find your microphone on the list and select it. This tells the computer which mic to use for recording.
Adjust Device Priority
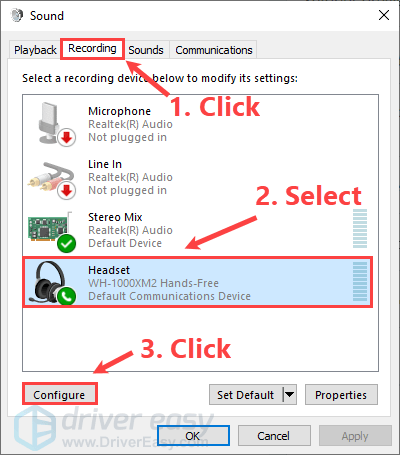
Go to the Control Panel and select “Hardware and Sound.” Click “Sound” and open the “Recording” tab. Right-click your microphone and choose “Set as Default Device.” This sets your mic as the top priority for audio input.
Adjust Microphone Levels
Adjusting microphone levels is key to clear sound on your computer. Proper levels prevent your voice from being too loud or too soft. This step helps improve audio quality for calls, recordings, and games.
Open Recording Devices
First, right-click the sound icon on your taskbar. Select “Sounds” or “Recording devices” from the menu. A new window shows all your input devices. Find your microphone in the list and click on it. Press the “Properties” button to open settings.
Modify Volume And Boost
In the microphone properties, go to the “Levels” tab. Here, you can change the volume slider. Increase volume to make your voice louder. Use the microphone boost option carefully. Too much boost can cause noise or distortion.
Test Sound Sensitivity
Speak softly into the mic and watch the level meter. The green bars should move with your voice. Adjust the volume and boost until the meter responds well. Avoid peaks in the red zone to prevent clipping. Test different speaking volumes for best results.

Credit: www.youtube.com
Use Built-in Sound Recorder
Using the built-in sound recorder on your computer is a quick way to test your microphone. It does not need any extra software. The sound recorder is easy to find and use on most computers. This method helps you check if your mic works properly and hear how it sounds.
Record A Sample
Open the sound recorder app on your computer. Click the record button to start capturing sound. Speak clearly into the microphone. Keep your voice steady and close to the mic. Stop the recording after a few seconds.
Play Back Recording
Find the recorded file in the sound recorder app. Click the play button to listen. Make sure you use headphones or speakers. Listen carefully to every part of your voice. Check for any cracks, noise, or low volume.
Evaluate Audio Quality
Think about the clarity of the sound. Is your voice clear and natural? Notice if there is any background noise. Check if the volume is too low or too high. Good audio means your mic is ready to use.
Test Microphone With Online Tools
Testing your microphone on a computer is simple using online tools. These tools help check if your mic works well. You do not need to install any software. Just visit a website, give permission, and start testing.
Choose Reliable Websites
Select websites known for safe and accurate mic tests. Sites like Online Mic Test and MicTests.com are popular. Avoid unknown sites to protect your privacy. Reliable sites offer clear instructions and easy use.
Grant Microphone Access
Most online tools ask for permission to use your mic. A pop-up will appear in your browser. Click “Allow” or “Grant Access” to continue. Without permission, the test cannot record your voice.
Analyze Test Results
Speak clearly into the microphone during the test. The tool will show sound levels or play back your voice. If the sound is low or not clear, adjust your mic settings. Repeat the test to confirm the fix.
Credit: www.drivereasy.com
Troubleshoot Common Issues
Testing your microphone on a computer can sometimes lead to common problems. These issues stop the mic from working well. Fixing them quickly helps you continue your calls or recordings without trouble. This section shows simple steps to solve common mic problems. Follow these tips to get clear sound and a working microphone again.
Fix No Sound Problems
First, check if the mic is plugged in correctly. Loose cables cause no sound issues. Make sure the mic is not muted in your computer settings. Also, test the mic on another device. This helps find if the problem is with the mic or the computer.
Resolve Static Or Noise
Static noise can ruin sound quality. Try moving the mic away from other electronic devices. These devices cause interference. Lower the microphone volume to reduce background noise. Use a pop filter or foam cover to block wind sounds. Clean the mic and its port to remove dust that causes noise.
Update Audio Drivers
Outdated drivers often cause mic problems. Go to your computer’s device manager. Find the audio input device and check for updates. Download and install the latest driver from the manufacturer’s site. Restart your computer after updating. Updated drivers improve mic performance and fix bugs.
Optimize Environment For Clear Sound
Creating a clear sound environment is key to testing your mic on a computer. A quiet and well-set space helps catch every word you say. Small changes can make a big difference in sound quality.
Minimize Background Noise
Turn off fans, air conditioners, and other noisy devices. Close windows to block outside sounds like traffic or birds. Choose a quiet room with soft surfaces that absorb sound, such as curtains or carpets. These steps reduce distractions and echo.
Use Pop Filters Or Windscreens
Pop filters block harsh sounds from fast air bursts when speaking. Windscreens help if you test your mic outdoors or in windy places. Both tools protect your mic from unwanted noise. They improve voice clarity and make recordings smoother.
Position Microphone Properly
Place the mic 6 to 12 inches from your mouth. Avoid pointing it directly at your nose or mouth to reduce breathing sounds. Keep the mic steady and avoid moving it while speaking. Good placement captures clear and natural sound.
Credit: univid.io
Frequently Asked Questions
How Can I Quickly Test My Computer Microphone?
Open your computer’s sound settings or control panel. Locate the microphone section and speak to see the input level. Alternatively, use online mic test websites for instant feedback.
Why Is My Computer Mic Not Recording Sound?
Check if your mic is muted or disabled in settings. Ensure the correct device is selected and drivers are up to date. Also, verify physical connections and permissions for apps.
What Tools Can I Use To Test Mic Quality?
Use built-in tools like Windows Sound Recorder or macOS Voice Memos. Online platforms such as Online Mic Test or Vocaroo provide simple, free testing options without software installation.
How Do I Improve My Microphone’s Sound Quality?
Reduce background noise and speak clearly near the mic. Adjust input volume in settings and use noise-canceling software if available. Regularly clean the mic to avoid distortion.
Conclusion
Testing your mic on a computer is quick and simple. Check settings, use built-in tools, or try free apps. Clear sound helps in calls, recordings, and games. Regular tests avoid problems later. Follow easy steps to ensure your mic works well.
Keep your device ready for any use. No stress, just a few clicks and you are set. Ready to speak and be heard clearly every time.
As an Amazon Associate, I earn from qualifying purchases.