Is your computer mic not working when you need it most? It’s frustrating, especially when you’re trying to join a call, record a message, or chat with friends.
But don’t worry—you can fix it. In this guide, you’ll discover simple steps to get your mic back to perfect working order. Whether you’re a beginner or not very tech-savvy, these easy tips will help you solve the problem quickly.
Keep reading, and you’ll be speaking clearly through your computer again in no time.
Check Basic Connections
Checking basic connections is the first step to fix your computer mic. Many problems come from loose or wrong connections. This simple check can save time and effort.
Start with the physical parts. Make sure cables and plugs fit well. Then, test the ports on your computer. Both steps help find connection issues fast.
Inspect Physical Mic Connections
Look at your mic cable closely. Check for any bends or breaks. A damaged cable can stop sound from reaching your computer.
Unplug the mic and plug it back in. Make sure it fits tightly. Loose plugs cause poor or no sound.
Try using a different cable if available. This can rule out cable problems. A good cable is key for a clear mic signal.
Verify Usb And Audio Jack Ports
Check the port where you connect the mic. Dust or dirt can block the connection. Clean the port gently with a soft brush or cloth.
Test the mic in another port if possible. Some ports may be faulty or disabled. Using a working port can fix your problem fast.
Confirm you use the correct port type. USB mics need USB ports. Audio jack mics need the right color-coded jack. Using the wrong port stops the mic from working.
Adjust Microphone Settings
Adjusting microphone settings is a key step to fix mic problems. Small changes can improve sound quality and make your mic work properly. This section shows simple ways to adjust settings on your computer. Follow these steps to get better mic performance and clear audio.
Set Mic As Default Device
Make sure your microphone is the default recording device. Open the sound settings on your computer. Look for the input or recording tab. Find your mic from the list of devices. Click on it and select “Set as Default.” This tells your computer to use this mic for all recordings and calls.
Increase Microphone Volume
Low mic volume can cause weak or quiet sound. Go to the microphone properties in sound settings. Find the volume or level tab. Slide the volume bar up to increase mic input. Test the sound by speaking and watching the input meter. Adjust until your voice is clear and loud enough.
Disable Microphone Enhancements
Some computers add sound effects that can reduce mic quality. These are called microphone enhancements. Open your mic properties and find the enhancements tab. Check the box to disable all enhancements. This stops the computer from changing your voice. It gives a more natural and clean sound.
Update Or Reinstall Drivers
Updating or reinstalling drivers can solve many microphone problems. Drivers help your computer talk to the mic. Old or broken drivers stop the mic from working right. Fixing these drivers can bring your mic back to life quickly.
Try updating the drivers first. New drivers fix bugs and improve performance. If that does not work, reinstalling might do the trick. This removes bad drivers and sets fresh ones.
Use Device Manager To Update Drivers
Open Device Manager on your PC. Find “Audio inputs and outputs.” Click the arrow to see your microphone. Right-click your mic and choose “Update driver.” Select “Search automatically for updated driver software.” Windows will look online for new drivers. Let it install any updates found. Restart your computer after updating. Test your mic to see if it works better.
Uninstall And Reinstall Mic Drivers
Go back to Device Manager. Right-click your microphone device. Choose “Uninstall device” from the menu. Confirm by clicking “Uninstall.” Restart your PC. Windows will detect the mic and reinstall drivers. This cleans out old files causing issues. Check your mic again after reinstalling. This step often fixes deeper driver problems.
Credit: www.dell.com
Run Windows Troubleshooter
Running the Windows Troubleshooter is a quick way to fix your computer mic problems. This tool finds common audio issues and tries to solve them automatically. It saves time and effort compared to manual fixes.
The troubleshooter checks settings, drivers, and hardware connections. It points out what needs fixing or changes settings for you. Follow the steps carefully to get your mic working again.
Access Audio Troubleshooter
Open the Start menu by clicking the Windows icon. Type “Troubleshoot settings” in the search box. Select the Troubleshoot settings option from the list.
Scroll down and find “Recording Audio” under Find and fix other problems. Click it, then press the “Run the troubleshooter” button. This starts the tool checking your microphone.
Follow Step-by-step Fixes
The troubleshooter asks questions about the mic issue. Answer clearly, so it can give the right solution. It may suggest updating drivers or changing permissions.
Follow all on-screen instructions carefully. Restart your computer if asked. Test the mic after the fixes to see if it works. Repeat the process if needed.
Check Privacy And App Permissions
Checking privacy and app permissions is a key step in fixing your computer microphone. Sometimes, the mic is blocked by privacy settings. Apps may not have permission to use the microphone. This can stop your mic from working properly. Adjusting these settings helps your mic work with the apps you want.
Allow Mic Access In Privacy Settings
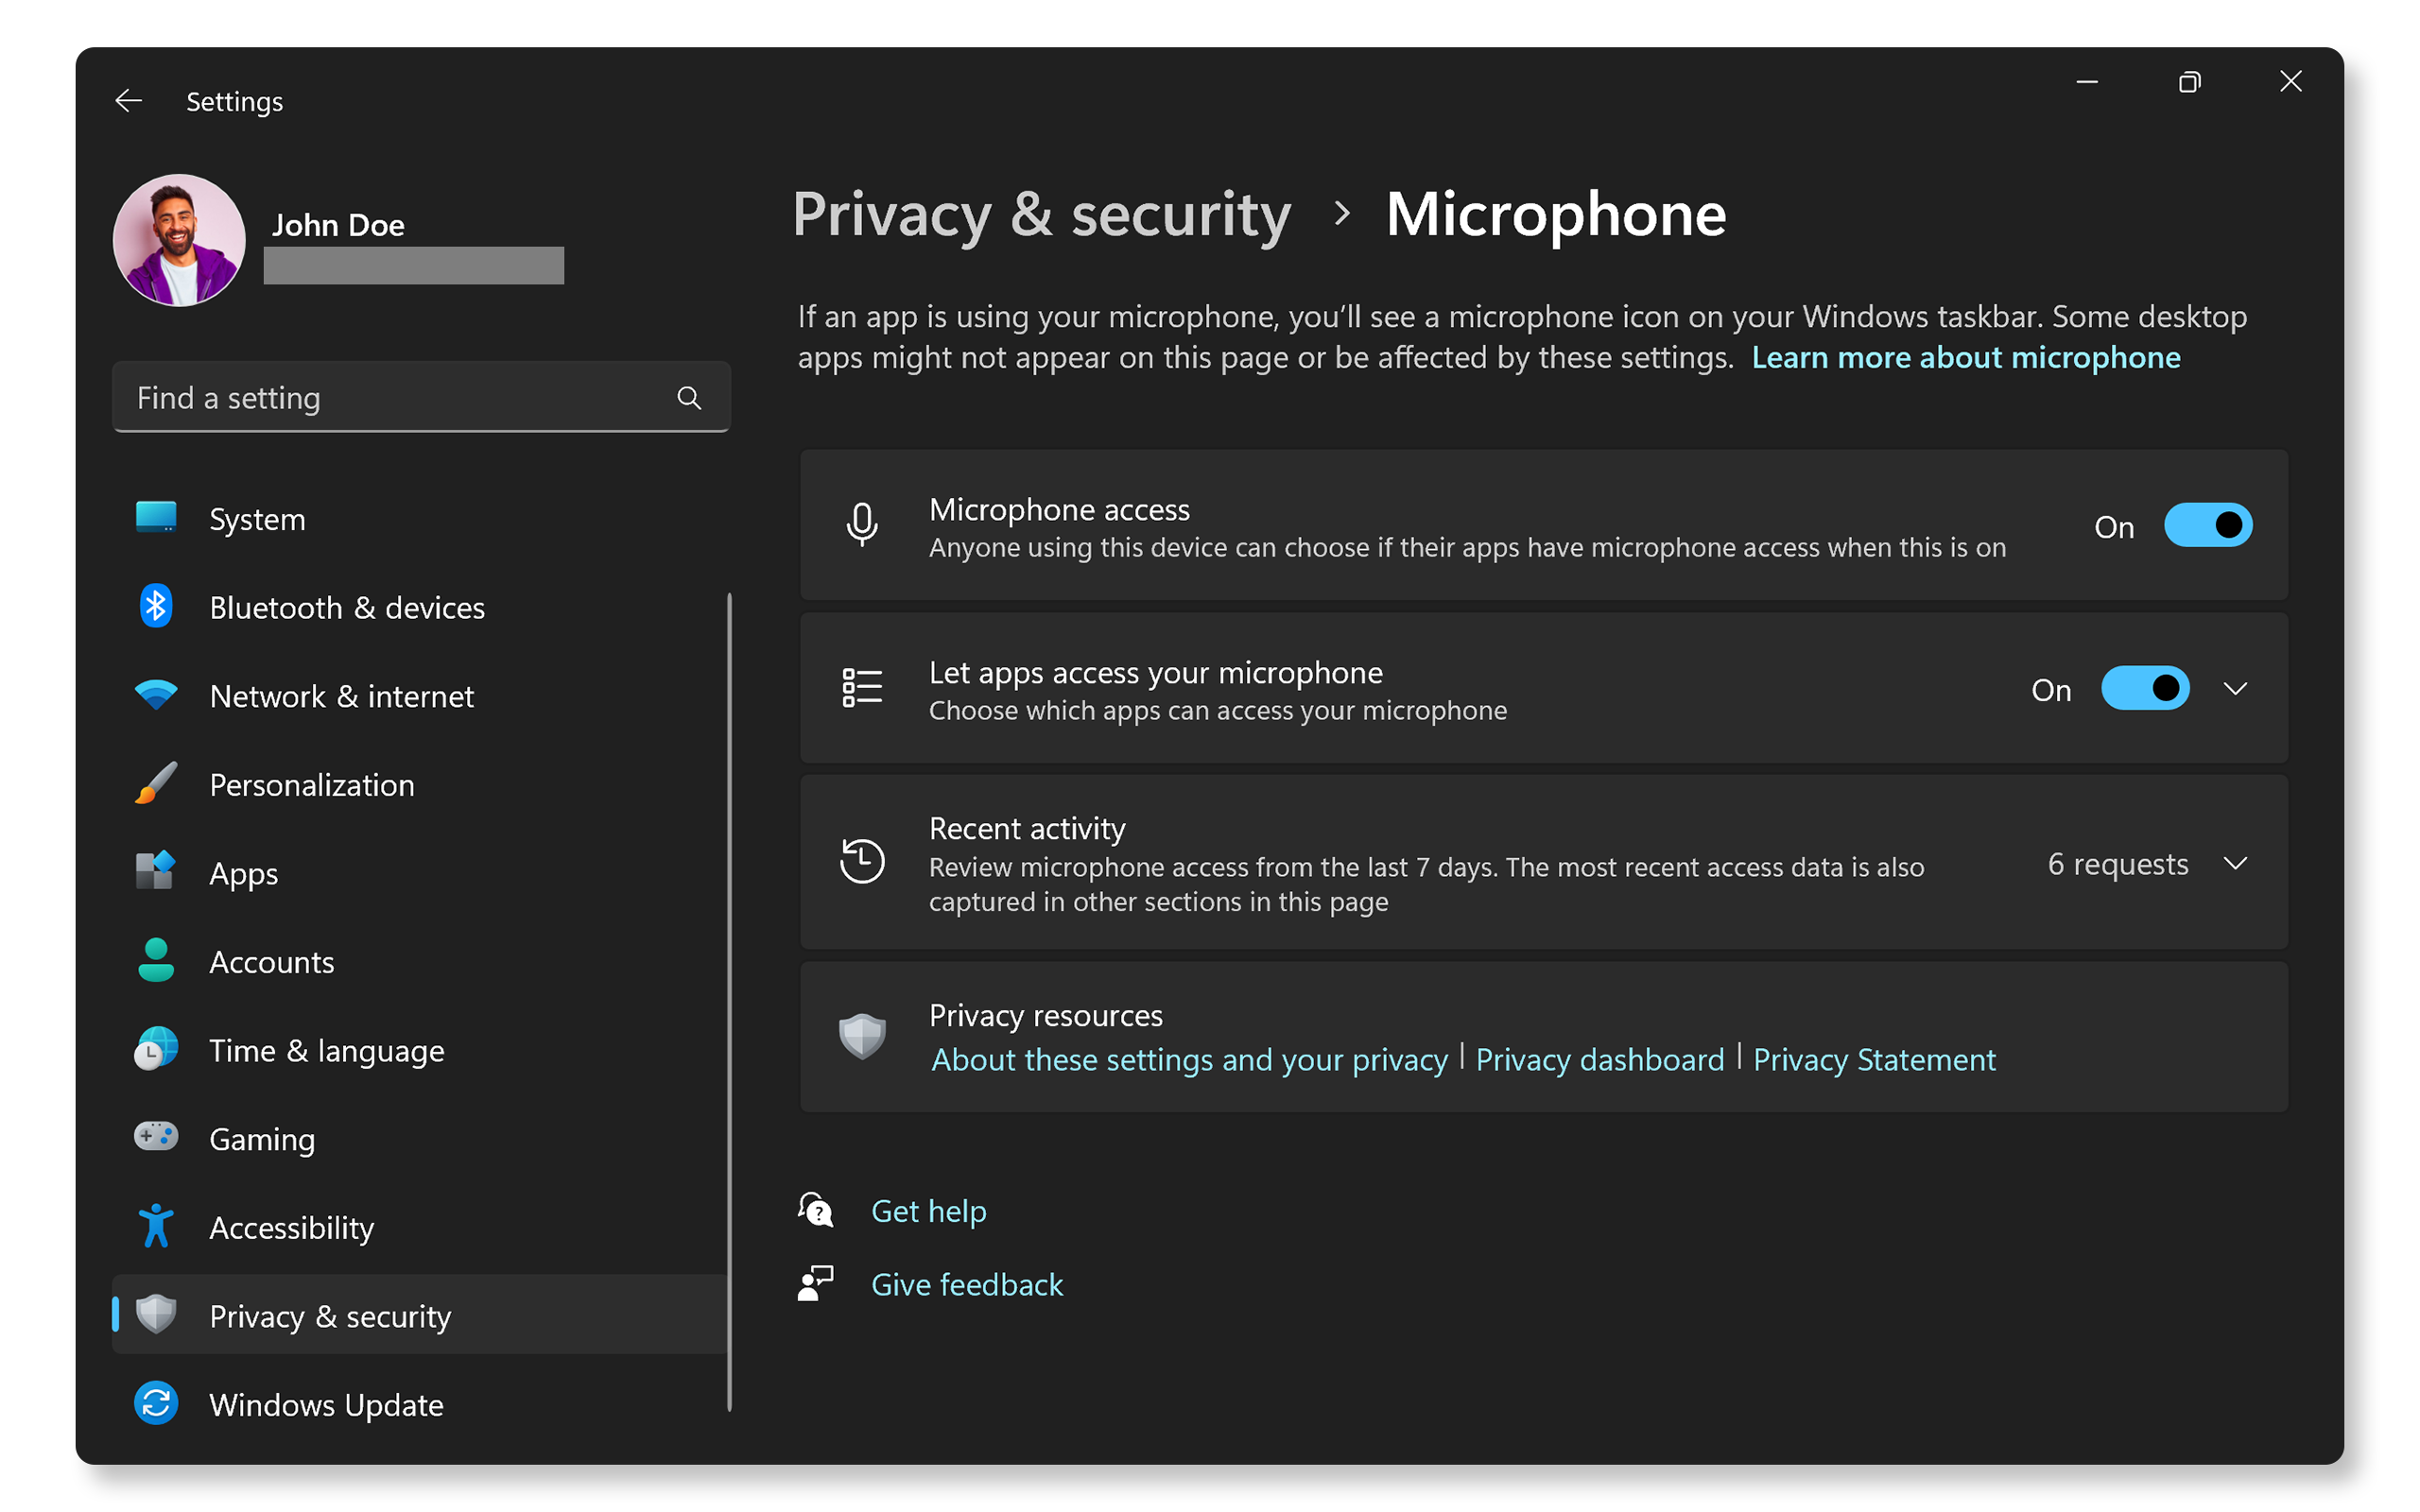
First, open your computer’s privacy settings. Find the microphone section. Make sure the microphone access is turned on. This lets your system use the mic for all apps. Without this, the mic stays off. Turn on the access button to enable the microphone.
Grant Permissions To Specific Apps
Next, check which apps can use the mic. Some apps need permission to record sound. Look for the list of apps under microphone settings. Allow access for the apps you want to use. If an app is blocked, the mic will not work there. Turn on permissions for each app to fix this issue.

Credit: www.youtube.com
Test Microphone On Another Device
Testing your microphone on another device helps find the problem fast. It shows if the issue is with the mic or your computer. This step saves time and avoids unnecessary fixes.
Rule Out Hardware Issues
Connect the microphone to a different device like a smartphone or another computer. Check if the mic works there. If it doesn’t, the mic might be broken or have a loose wire. Hardware problems need repair or replacement.
Confirm Mic Functionality
Use a voice recorder or call app on the second device to test sound quality. Speak clearly and listen for any noise or distortion. A working mic records sound well without static or cutting out. This confirms the mic’s condition before fixing your computer.
Use Third-party Audio Tools
Using third-party audio tools can help fix computer mic problems quickly. These tools offer better control over your microphone settings. They can test your mic and adjust input levels easily. This makes your voice clearer and reduces background noise. Many of these tools are free and easy to use.
Download Mic Testing Software
Start by downloading reliable mic testing software. Choose simple programs that show your mic’s status clearly. These apps let you hear your own voice through headphones. This helps you check if the mic works well. Some popular options include Voice Recorder and Audacity.
Calibrate Mic Input Levels
After testing, adjust your mic input levels. Most tools have sliders to increase or decrease volume. Set the level so your voice is loud but not distorted. Avoid too high levels that cause static or clipping sounds. Proper calibration ensures better sound quality during calls or recordings.

Credit: support.microsoft.com
Advanced Troubleshooting Options
Advanced troubleshooting options help fix complex mic problems. These steps dig deeper into software and settings issues. They can resolve conflicts and restore the mic to proper working order.
Try these methods if basic fixes do not work. They require more attention but often solve hidden problems.
Check For Conflicting Software
Some apps use your mic and block others. This causes the mic to stop working in some programs. Close all apps that use the mic. Check Task Manager on Windows or Activity Monitor on Mac.
Look for software like voice changers, recording apps, or communication tools. Disable or uninstall apps causing conflicts. Restart the computer and test the mic again.
Reset Audio Settings To Default
Custom audio settings might cause mic issues. Resetting brings all sound settings back to normal. On Windows, open Sound Settings and choose “Reset” under the Input section.
On Mac, go to System Preferences > Sound. Remove any custom profiles or adjustments. Restart the device to apply default settings fully.
Frequently Asked Questions
How Do I Check If My Computer Mic Is Working?
Go to your computer’s sound settings and find the input section. Speak into the mic and watch the input level meter. If it moves, your mic is working. You can also test it using recording apps or online mic testers for accuracy.
Why Is My Computer Mic Not Picking Up Sound?
This could be due to muted mic, wrong device selection, or driver issues. Check your sound settings to ensure the correct mic is selected and unmuted. Update or reinstall audio drivers if needed to fix hardware recognition problems.
How Can I Fix Low Microphone Volume On My Pc?
Increase the mic volume in your sound settings under the input device properties. Also, check physical mic placement and test with different apps. Updating drivers and disabling audio enhancements might help improve sound levels.
What Should I Do If My Mic Is Not Detected?
Restart your computer and check the connection. Ensure the mic is properly plugged in. Update your audio drivers and check device manager for any hardware issues. If still not detected, try a different mic or port.
Conclusion
Fixing your computer mic is easier than it seems. Check connections and settings first. Update drivers to avoid sound issues. Test the mic on different apps. Clean the mic to remove dust or dirt. Restart your computer to refresh the system.
These simple steps often solve most mic problems. Keep calm and follow each step carefully. Your mic should work well again soon. Clear sound makes communication better and smoother. Don’t give up if it takes a little time.
As an Amazon Associate, I earn from qualifying purchases.