Are you having trouble with your microphone and not sure if it’s working right on your computer? You’re not alone.
Whether you need to join an important call, record a podcast, or just chat with friends, a clear mic is key. But how do you quickly check if your mic is set up correctly and picking up sound? This guide will walk you through simple steps to test your microphone, fix common issues, and get your voice heard loud and clear.
Keep reading—your perfect sound setup is closer than you think!

Credit: www.livewebinar.com
Mic Types On Computers
Microphones on computers come in several types. Each type fits different needs and setups. Knowing these helps you check and use your mic properly. Some mics are built inside the computer. Others connect from outside. Some are part of headsets. Understanding these types makes mic checking easier.
Built-in Mics
Built-in microphones are inside laptops or monitors. They do not need extra cables or devices. These mics work for basic calls and recordings. Their quality is usually average. They pick up sound from the room clearly. Noise and distance can affect their performance.
External Usb Mics
External USB microphones plug into the computer’s USB port. They offer better sound quality than built-in mics. Many streamers and podcasters use them. These mics often have volume controls. They are easy to connect and remove. They work well for clear voice recording.
Headset Mics
Headset microphones come with headphones or earbuds. They stay close to your mouth. This helps capture your voice clearly. Headset mics reduce background noise. They are good for calls and gaming. These mics usually connect by USB or audio jack.
Credit: univid.io
Preparing Your Mic
Preparing your microphone properly is the first step to clear sound on your computer. A well-prepared mic helps avoid problems during calls or recordings. This section shows how to connect and adjust your mic for the best results.
Connecting The Mic
Find the correct port on your computer for the microphone. Most mics use a 3.5mm jack or USB connection. Plug the microphone firmly into the port. Make sure the connection is secure to avoid sound cuts. Wireless mics need to be paired via Bluetooth. Check your mic’s manual if unsure about the connection type.
Adjusting Mic Settings
Open your computer’s sound settings to adjust the microphone. Set the mic as the default recording device. Test the input volume and change it if the sound is too low or too loud. Lower background noise by reducing the microphone boost. Use the built-in microphone test tools to check the sound quality. Adjusting settings improves clarity and reduces unwanted noise.
Testing Mic On Windows
Testing your microphone on Windows is simple and quick. It helps ensure your mic works well before calls or recordings. Windows offers easy tools to check your microphone and fix problems. Follow these steps to test your mic effectively.
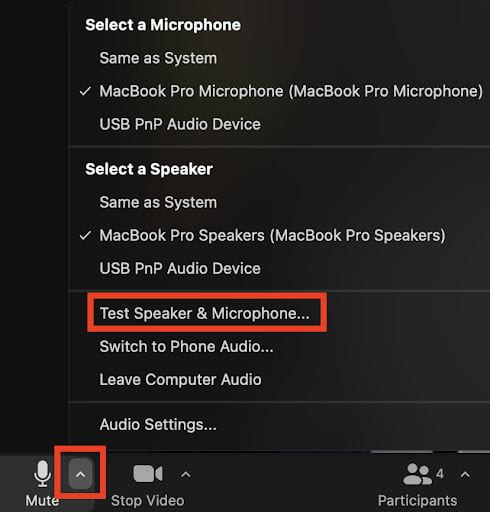
Using Sound Settings
Open the Start menu and select Settings. Choose System, then Sound from the list. Under Input, find your microphone device. Speak into your mic and watch the blue bar move. If the bar moves, your mic is working. Adjust the input volume slider if needed.
Recording With Voice Recorder
Open the Voice Recorder app from the Start menu. Click the record button to start. Speak clearly into your mic for a few seconds. Click the stop button to end the recording. Play back the recording to hear your voice. This confirms your mic captures sound well.
Troubleshooting Common Issues
Check that your mic is properly plugged in. Make sure Windows has permission to use the mic. Update your audio drivers via Device Manager. Disable any apps that may block mic access. Restart your PC if the mic still does not work. Try a different mic to rule out hardware issues.
Testing Mic On Mac
Testing the microphone on your Mac is simple and quick. It helps ensure your device captures sound clearly. You can check your mic using built-in tools without extra software. This guide shows easy steps to test and fix your Mac’s microphone.
Accessing Sound Preferences
Start by clicking the Apple menu in the top-left corner. Select “System Preferences” and then click “Sound.” Choose the “Input” tab to see your microphone list. Speak softly into the mic and watch the input level bar. If the bar moves, your mic is working correctly.
Using Quicktime Player
Open QuickTime Player from the Applications folder. Click “File” and choose “New Audio Recording.” Press the red record button and speak into the mic. Stop the recording and play it back to check sound quality. This method helps hear exactly how your mic sounds.
Fixing Mic Problems
Check if your mic is muted or volume is low in Sound Preferences. Restart your Mac to refresh system settings. Make sure no apps are blocking mic access in Privacy settings. Update macOS to fix any software bugs. Try using another app to test the mic again.
Using Online Mic Test Tools
Using online mic test tools offers a quick way to check if your microphone works. These tools do not need downloads or special skills. You can test your mic directly from your browser. This method saves time and helps identify issues fast. It works on most computers and devices. Just follow a few easy steps and hear your voice through the test.
Top Free Websites
Several free websites let you test your microphone online. Some popular options include Online Mic Test, MicTests.com, and SpeakerBoost. These sites provide simple interfaces and clear instructions. They allow you to see if your mic picks up sound. No registration or fees are required. You only need a working internet connection and a browser.
How To Use Online Tests
First, open the mic test website in your browser. Then, allow the site to access your microphone. Next, speak clearly into your mic. The tool will show your voice level on the screen. Watch the sound bars or meters move as you talk. If you see no movement, check your mic settings or connection. Some sites let you play back your recording. This step confirms your mic records sound well.
Improving Mic Quality
Improving your microphone’s quality helps make your voice clear and easy to hear. Clear sound is important for calls, recordings, and online meetings. Small changes can make a big difference. Focus on reducing noise and adjusting settings.
Reducing Background Noise
Background noise can distract listeners and reduce sound quality. Find a quiet room to use your mic. Close windows and doors to block outside sounds. Turn off noisy devices nearby, such as fans or air conditioners.
Use a microphone with noise-canceling features if possible. Position the mic close to your mouth but not too close. This helps pick up your voice clearly and lowers other sounds.
Adjusting Mic Sensitivity
Mic sensitivity controls how much sound the mic picks up. Too high sensitivity captures unwanted noise. Too low makes your voice sound faint. Find the right balance in your computer’s sound settings.
Test your mic while adjusting sensitivity. Speak normally and listen to the playback. Lower or raise sensitivity until your voice sounds clear without extra noise. This improves overall mic quality effectively.
Credit: ats.udel.edu
Frequently Asked Questions
How Do I Test My Microphone On Windows?
Open Sound settings, then go to Input devices. Speak, and check the input level bar. If it moves, your mic works.
Why Is My Microphone Not Detected By The Computer?
Check if the mic is properly connected and enabled. Update drivers and verify privacy settings allow mic access.
How Can I Improve Microphone Sound Quality On Pc?
Use a quiet environment, adjust input volume, update drivers, and consider an external mic for clearer sound.
Can I Check My Mic On Mac Without Extra Software?
Yes, use the Sound settings in System Preferences. Speak and observe the input level meter for activity.
Conclusion
Checking your computer’s microphone is simple and quick. Just follow the steps carefully to ensure it works well. Testing helps avoid problems during calls or recordings. Keep your drivers and settings up to date for best results. A clear mic makes communication much easier and better.
Try these tips anytime you need to check your mic. You will feel more confident using your computer’s sound features. Simple checks save time and reduce frustration. Give it a try now!
As an Amazon Associate, I earn from qualifying purchases.