As an Amazon Associate, I earn from qualifying purchases.
Looking to connect a mic to your computer but don’t know where to start? You’re in the right place.
Whether you want to record a podcast, join crystal-clear video calls, or improve your gaming chat, having your microphone set up correctly is key. This guide will walk you through simple, step-by-step instructions so you can get your mic working fast.
By the end, you’ll feel confident and ready to sound your best every time. Let’s dive in and make sure your voice is heard loud and clear!
Choosing The Right Microphone
Choosing the right microphone is key to clear and good sound. A proper mic captures your voice without noise or echo. This choice depends on your needs, budget, and the type of computer you use.
Types Of Microphones
There are three main types of microphones: dynamic, condenser, and ribbon. Dynamic mics are tough and good for loud sounds. Condenser mics capture clear and detailed sound. Ribbon mics work well for soft and warm tones but are fragile. Each type fits different uses and environments.
Usb Vs. Xlr Mics
USB microphones plug directly into your computer. They are easy to use and need no extra gear. XLR microphones require an audio interface or mixer. They offer better sound quality and more control. USB mics suit beginners. XLR mics are better for advanced users.
Factors To Consider
Think about your recording space. Quiet rooms need less noise control. Your budget also matters. Some mics cost more but last longer. Check your computer’s ports before buying. Also, consider the mic’s size and weight. Comfort is important for long sessions.

Credit: www.youtube.com
Preparing Your Computer
Preparing your computer is the first step to connect a microphone properly. It ensures the mic works well and delivers clear sound. This step saves time and avoids frustration later. Follow these simple tasks to get your computer ready for a microphone.
Checking Audio Ports
Look at the back or side of your computer. Find the audio ports. Most computers have a pink or red port for microphones. Some use a combo jack for both headphones and mics. If your mic uses USB, look for a free USB port. Make sure the port is clean and not damaged. This helps the mic connect correctly.
Installing Necessary Drivers
Some microphones need special drivers to work. Drivers help your computer recognize the mic. Check the mic box or the manufacturer’s website for drivers. Download and install the correct driver for your computer system. Restart your computer after installation. This step ensures your mic works smoothly.
Configuring Sound Settings
Open the sound settings on your computer. On Windows, go to Control Panel or Settings, then Sound. On Mac, open System Preferences and select Sound. Find the input tab and select your microphone. Adjust the input volume to a good level. Test the mic to check if it picks up your voice. Proper settings improve recording quality.
Connecting The Microphone
Connecting your microphone to a computer is simple. The method depends on the type of microphone and your computer’s ports. Each connection type has its own steps and tools. Below are common ways to connect a microphone.
Using Usb Connection
USB microphones plug directly into your computer’s USB port. No extra equipment is needed. Just insert the USB cable into the microphone and the computer. The system often detects the device automatically. You may need to select the USB mic as your audio input in settings. This method works well for podcasts and calls.
Using 3.5mm Jack
Many microphones use a 3.5mm audio jack. This plug fits into the microphone or line-in port on your computer. Look for a pink or microphone symbol near the port. Plug the microphone cable firmly into this port. Then, set the mic as the input device in your sound settings. This method suits simple, budget microphones.
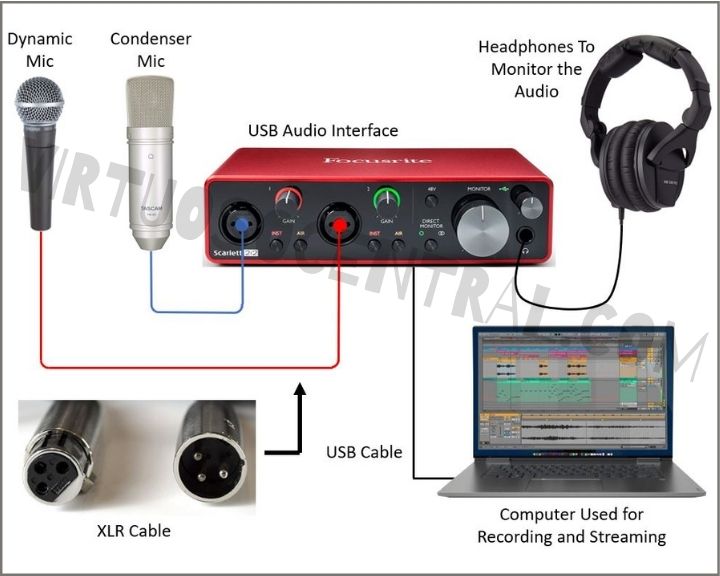
Using Xlr With Audio Interface
XLR cables connect professional microphones to audio interfaces. The interface links to your computer via USB or Thunderbolt. First, plug the XLR cable into the microphone and interface. Then, connect the interface to your computer. Turn on the interface and select it as the input device. This setup offers better sound quality and control.

Credit: mynewmicrophone.com
Testing And Adjusting Audio
After connecting your mic to the computer, testing and adjusting the audio is crucial. This step ensures clear sound and avoids issues during recording or calls. It helps you find the right settings for your mic and environment.
Recording A Test Clip
Start by recording a short test clip. Use any simple audio recording app on your computer. Speak clearly and at a normal volume. Play back the clip to hear how your voice sounds. This helps identify if the mic picks up your voice well.
Adjusting Input Levels
Check the input level in your computer’s sound settings. If the sound is too low, raise the input volume. If it clips or distorts, lower it. The goal is to find a balance where your voice is clear and not too loud.
Reducing Background Noise
Background noise can distract from your voice. Close windows and doors to reduce outside sounds. Move away from noisy devices like fans or computers. Use noise reduction features in your recording app if available. This keeps your audio clean and clear.
Troubleshooting Common Issues
Connecting a microphone to a computer should be simple. Sometimes, problems appear. These issues can stop your mic from working right. Knowing how to fix common problems saves time and stress.
This section covers typical mic troubles and easy fixes. Follow these steps to get your mic working well again.
Mic Not Detected
Check if the mic is plugged in properly. Try using a different USB port or audio jack. Restart your computer to refresh device settings. Look in your sound settings to see if the mic is listed. Update your audio drivers from the device manager. Disable other audio devices that may cause conflicts.
Poor Sound Quality
Make sure the microphone is clean and not blocked. Adjust the input volume in your sound settings. Move closer to the mic to reduce background noise. Use a pop filter to cut unwanted sounds. Check if the cable is damaged or loose. Try the mic on another device to rule out hardware issues.
Latency Problems
Latency causes delays between speaking and hearing sound. Lower the buffer size in your audio settings. Close unnecessary apps that use CPU power. Use a wired connection instead of wireless if possible. Update your audio interface or sound card drivers. Consider using dedicated audio software to reduce lag.
Credit: virtuosocentral.com
Tips For Better Audio Quality
Good audio quality makes a big difference in your recordings. Clear sound helps your voice come through strong and natural. Small changes can improve your audio a lot. Here are some simple tips to get better sound from your mic.
Using Pop Filters
Pop filters stop loud popping sounds when you say words with “p” or “b”. They catch bursts of air before they hit the mic. Attach a pop filter in front of your microphone. It keeps your voice smooth and clear. Pop filters also protect your mic from saliva.
Proper Mic Placement
Place the mic about 6 to 12 inches from your mouth. Too close causes distortion; too far makes sound thin. Angle the mic slightly off to the side. This reduces harsh breath sounds. Test small changes to find the best spot for your voice.
Room Acoustics
Sound bounces off hard walls and creates echoes. Soft materials like curtains, carpets, and cushions absorb sound. Record in a quiet room with fewer hard surfaces. Adding blankets or foam panels can reduce echo and noise. This makes your voice sound warm and clear.
Frequently Asked Questions
How Do I Connect A Mic To My Computer?
To connect a mic, plug it into the computer’s microphone jack or USB port. Then, select the mic in your audio settings.
Can I Use A Usb Mic Directly With My Pc?
Yes, USB mics connect directly via USB ports. They usually require no extra drivers and are easy to set up.
How To Check If My Mic Is Working On Pc?
Go to Sound settings, find Input devices, and speak to see if the volume bar moves. This confirms mic functionality.
What Settings Should I Adjust For Better Mic Sound?
Adjust input volume and disable noise suppression in sound settings. Use software enhancements to improve audio clarity and reduce background noise.
Conclusion
Connecting a mic to your computer is simple and quick. Choose the right cable or adapter for your mic type. Plug it into the correct port on your computer. Adjust settings in the sound control panel for the best sound.
Test the mic to make sure it works well. Clear audio helps in calls, recordings, and streaming. Follow these easy steps to enjoy better sound quality. No need to worry about technical details. Just connect and start using your mic today.
As an Amazon Associate, I earn from qualifying purchases.