
Are you ready to get the best sound from your audio system? Connecting your speakers to your receiver might seem tricky, but it doesn’t have to be.
With the right steps, you can enjoy clear, powerful sound in no time. In this guide, you’ll learn exactly how to connect your speakers to your receiver the easy way. Whether you’re setting up for movies, music, or gaming, this simple process will make your experience much better.
Keep reading, and you’ll have your system up and running before you know it!
Credit: www.audioholics.com
Choosing The Right Receiver
Choosing the right receiver is important for a good sound system. The receiver connects your speakers to audio sources. It controls power and sound quality. Picking the right one helps your speakers work well and last longer. Consider these points before buying a receiver.
Matching Power Output
Check the power output of the receiver. It should match your speakers’ power range. Too little power causes weak sound. Too much power can damage speakers. Find a receiver that delivers power close to your speaker’s rating. This balance protects your equipment and improves sound.
Checking Speaker Compatibility
Look at the speaker’s impedance rating. Most speakers have 4, 6, or 8 ohms. The receiver must support that impedance. Using a receiver with wrong impedance can cause poor sound or damage. Make sure the receiver supports the number of speakers you want to connect. This ensures stable and clear audio.
Considering Connection Types
Receivers offer different connection options. Common types are speaker wire terminals, RCA, and HDMI. Match the receiver’s connections with your speaker cables. Some receivers support wireless connections like Bluetooth or Wi-Fi. Choose the connections that fit your setup. This makes installation easier and keeps your system organized.
Gathering Necessary Tools And Materials
Before connecting your speakers to the receiver, gather all the necessary tools and materials. Having the right items ready makes the process smoother and faster. This step helps avoid interruptions or mistakes during setup.
Speaker Wire Types
Choose the right speaker wire for your setup. Most wires have two conductors, usually marked with color or stripes. Copper wire is common and conducts sound signals well. The wire gauge matters; thicker wires carry signals better over long distances. Use 16-gauge wire for most home setups. For longer runs, 14-gauge wire works best.
Wire Strippers And Connectors
Wire strippers remove insulation without cutting the wire. This tool helps make clean, precise connections. Use them to expose the copper ends before attaching connectors. Connectors, such as banana plugs or spade terminals, ensure secure and easy connections. They prevent loose wires and reduce signal loss.
Additional Accessories
Other helpful items include electrical tape and cable ties. Tape secures wire ends and prevents short circuits. Cable ties keep wires neat and organized. Labeling tags help identify each speaker wire. This avoids confusion when connecting multiple speakers.
Preparing Speaker Wires
Preparing speaker wires is a key step before connecting your speakers to a receiver. Good preparation ensures clear sound and a solid connection. Careful handling of the wires reduces signal loss and prevents shorts. Follow these simple steps to get your wires ready.
Measuring And Cutting Wires
Measure the distance from the receiver to each speaker. Add a little extra length for flexibility. Cut the wire using sharp wire cutters. Make sure the ends are clean and straight. Avoid cutting too short to prevent tension on the wires.
Stripping The Wire Ends
Remove about half an inch of the outer insulation. Use a wire stripper for clean and safe removal. Avoid cutting the metal strands inside. Expose enough wire to fit into the receiver or speaker terminals.
Twisting And Securing Strands
Twist the exposed wire strands tightly together. This prevents stray strands from causing shorts. Make the twisted end firm but not too tight. Secure the wire in the terminal by inserting and tightening it firmly.

Credit: www.youtube.com
Connecting Wires To Speakers
Connecting wires to speakers is an important step in setting up your audio system. Proper wiring ensures clear sound and prevents damage to equipment. This guide helps you connect wires easily and correctly.
Identifying Positive And Negative Terminals
Speakers have two terminals: positive and negative. The positive terminal is often red or marked with a plus (+) sign. The negative terminal is usually black or marked with a minus (-) sign. Connecting wires to the correct terminals is crucial for good sound. Wrong connections can cause weak or distorted audio.
Attaching Wires To Binding Posts
Binding posts are common on speakers and receivers. First, loosen the binding post by turning it counterclockwise. Insert the bare wire into the hole or wrap it around the post. Tighten the post by turning it clockwise to secure the wire. Make sure wires are snug and not touching each other.
Using Banana Plugs Or Spade Connectors
Banana plugs and spade connectors simplify speaker wiring. Insert the bare wire into the connector and tighten the screw. Banana plugs fit into the binding post hole easily. Spade connectors wrap around the binding post and tighten with a screw. These connectors provide a secure and stable connection.
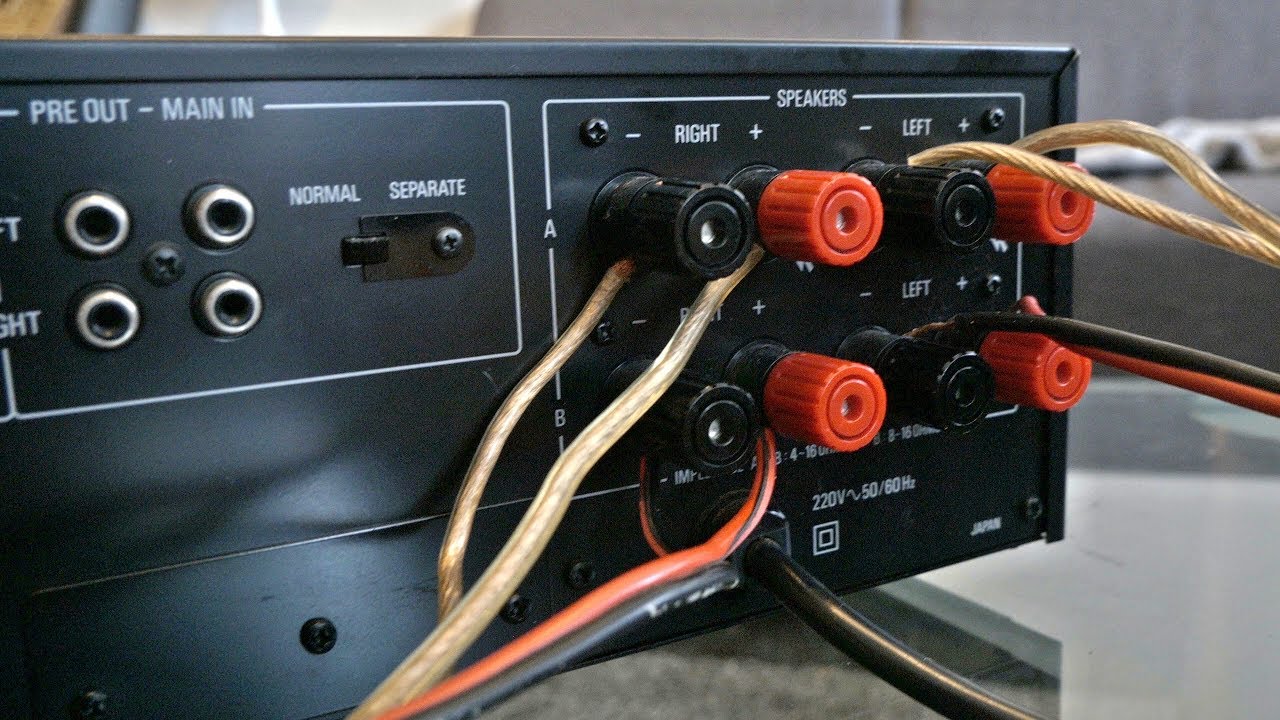
Connecting Speakers To Receiver
Connecting your speakers to a receiver is an important step in setting up your audio system. It helps you enjoy clear and powerful sound from your music, movies, or games. The process is simple but needs careful attention to detail.
Each connection affects the sound quality and system performance. Follow these steps to connect your speakers properly and safely.
Locating Receiver Output Terminals
Start by finding the speaker output terminals on your receiver. These are usually at the back panel. They look like pairs of red and black binding posts or spring clips. Each pair is labeled for different channels, such as front left, front right, center, and surround speakers. Make sure you identify the correct terminals for your speaker setup.
Ensuring Correct Polarity
Check the polarity of your speaker wires before connecting. Polarity means matching the positive (+) and negative (-) terminals. The red terminal is positive, and the black terminal is negative. Connect the red wire to the red terminal and the black wire to the black terminal. Correct polarity ensures the sound is clear and balanced.
Securing Connections Firmly
Insert the speaker wire into the terminals tightly. Loose connections can cause poor sound or no sound at all. Use a screwdriver if needed to tighten the binding posts. Make sure no stray wire strands touch each other or other terminals. Firm connections keep your audio system working smoothly and safely.
Testing And Adjusting Sound
Testing and adjusting sound ensures your speakers and receiver work well together. This step helps find clear, balanced audio. It avoids damage and improves listening experience. Follow simple checks and tweaks for best results.
Powering On And Initial Check
Turn on your receiver first. Then power on the speakers. Listen for any noise or hum. Check if all speakers produce sound. Use a test tone if your receiver has one. This confirms all connections are correct.
Balancing Volume And Tone
Adjust the volume to a comfortable level. Avoid very high volume to protect speakers. Use tone controls to set bass and treble. Find a natural sound that suits your room. Balance left and right speakers equally.
Troubleshooting Common Issues
Check cables if sound is missing or weak. Make sure speaker wires are tight and correct. Replace faulty cables if needed. Reduce interference by moving devices away. Reset receiver settings if sound is distorted.
Tips For Maintaining Sound Quality
Maintaining sound quality is important for the best audio experience. Small steps can keep your speakers and receiver working well. Clean sound comes from good care and smart setup.
Regular Cable Inspection
Check speaker cables often for damage or loose connections. Replace worn or frayed cables to stop sound issues. Tight connections help keep the sound clear and strong. Clean cable ends with a soft cloth to remove dust.
Avoiding Interference
Keep speaker wires away from power cords and devices. Electrical interference can cause buzzing or static noise. Use shielded cables to reduce interference. Turn off nearby devices that may affect sound quality.
Proper Speaker Placement
Place speakers on solid, stable surfaces to avoid vibrations. Position speakers at ear level for clear sound. Avoid corners or walls that cause echo or muffled sound. Leave space between speakers and walls for better bass.
Credit: www.youtube.com
Frequently Asked Questions
How Do I Connect Speakers To A Receiver?
Use speaker wire to connect receiver terminals to speaker terminals. Match positive (+) and negative (-) terminals for proper polarity. Ensure connections are firm and secure to avoid sound issues.
What Type Of Speaker Wire Should I Use?
Use 16-gauge speaker wire for most home setups. Thicker wires (14-gauge) suit longer distances. Choose high-quality, oxygen-free copper wire for better sound quality.
Can I Connect Multiple Speakers To One Receiver?
Yes, but check receiver’s impedance rating. Use speaker selectors or impedance-matching devices for multiple speakers. Avoid overloading the receiver to prevent damage.
How Do I Know If My Speakers Are Compatible?
Check speaker impedance and power ratings. Match these with the receiver’s specifications. Compatibility ensures optimal performance and prevents equipment damage.
Conclusion
Connecting speakers to a receiver is easier than it seems. Match the right wires to the correct ports. Tighten the connections to avoid loose sound. Double-check your setup before turning the receiver on. Test the sound to ensure everything works well.
Enjoy clear audio from your speakers. This simple process improves your listening experience. Try it step-by-step for best results. Sound setup done right brings joy to your space.
As an Amazon Associate, I earn from qualifying purchases.

