If you have an XLR microphone and want to use it with your computer, you might be wondering how to make the connection work smoothly. You’re not alone—many people find this step confusing at first.
But don’t worry, it’s easier than you think. You’ll discover simple, clear steps to connect your XLR mic to your computer without any hassle. By the end, you’ll be ready to record crystal-clear sound for podcasts, music, or video calls.
Keep reading to unlock the full potential of your microphone!
Choosing The Right Equipment
Choosing the right equipment is the first step to connect an XLR mic to your computer. The right gear ensures clear sound and easy setup. It helps avoid technical problems and saves time. Understanding basic tools will guide you in picking what fits your needs and budget.
Xlr Microphones Basics
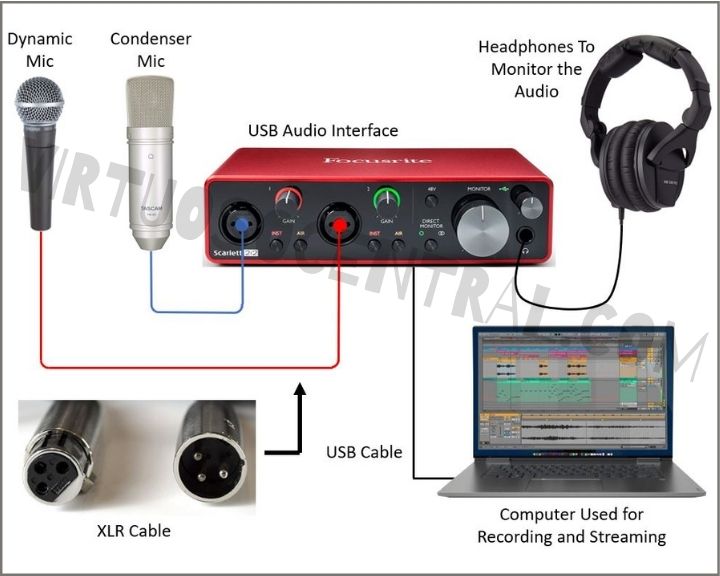
XLR microphones use three-pin connectors for balanced audio signals. They reduce noise and provide better sound quality than regular mics. These mics require extra equipment to connect to a computer. They often need power, known as phantom power, to work properly.
Audio Interface Options
An audio interface converts the mic’s signal into a digital format. It connects directly to your computer via USB or Thunderbolt. This device improves sound clarity and reduces delay. Many interfaces also supply phantom power to your XLR mic. Choosing one depends on your budget and recording needs.
Usb Audio Interface Vs Mixer
A USB audio interface focuses on audio input and output only. It is simpler and best for solo recording. Mixers handle multiple audio sources at once. They offer more control over sound levels and effects. Mixers are ideal for complex setups but can be harder to use. Choose an interface for ease or a mixer for flexibility.
Required Cables And Adapters
To connect an XLR microphone to a computer, the right cables and adapters are necessary. These tools help translate the microphone’s signal into a format your computer can understand. Choosing the correct cable or adapter affects sound quality and ease of use.
Xlr To Usb Cables
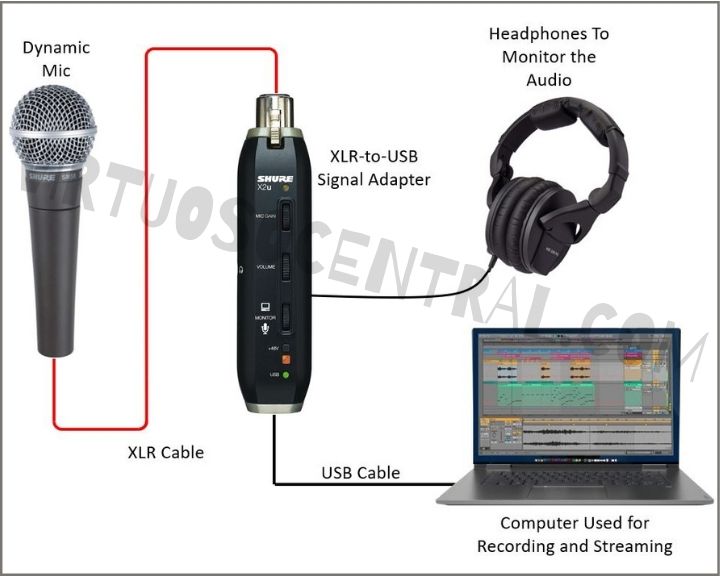
XLR to USB cables are popular for direct connection. They have an XLR plug on one end and a USB plug on the other. This cable lets you plug your microphone straight into a USB port. It works well for recording, streaming, and podcasting. No extra equipment is needed, making it simple for beginners.
Xlr To 3.5mm Adapters
XLR to 3.5mm adapters convert the XLR output to a 3.5mm jack. This type fits into your computer’s headphone or microphone input. Use these adapters if your computer lacks USB audio inputs. Keep in mind, sound quality may drop compared to USB connections. These adapters are best for casual or basic use.
When To Use Each Cable Type
Choose an XLR to USB cable for better sound quality and easy setup. It is ideal for recording and professional use. Pick an XLR to 3.5mm adapter for simple tasks or older computers. This option is less expensive but may reduce audio clarity. Consider your needs and equipment before buying.
Setting Up Your Hardware
Setting up your hardware is the first step to connect an XLR mic to your computer. This process ensures your microphone works correctly and delivers clear sound. The hardware setup involves three main tasks: connecting the mic to the interface, linking the interface to the computer, and powering your microphone.
Connecting The Mic To The Interface
Start by plugging your XLR microphone cable into the mic. The XLR cable has three pins that fit perfectly into the mic’s port. Next, connect the other end of the cable to your audio interface. The interface has an XLR input designed for this connection. Make sure the cable clicks into place. A loose connection can cause noise or no sound at all.
Connecting The Interface To The Computer
Use a USB cable to link the audio interface to your computer. Most interfaces come with a USB Type-B to Type-A cable. Plug the USB Type-B end into the interface and the Type-A end into your computer’s USB port. The computer should recognize the device automatically. If not, install the driver software from the manufacturer’s website.
Powering Your Microphone
Many XLR mics need phantom power to work. Phantom power is a 48-volt power supply that comes from the audio interface. Find the phantom power switch on your interface and turn it on. Only activate phantom power if your microphone requires it. Condenser microphones usually need phantom power, but dynamic mics do not. Double-check your mic’s manual to avoid damage.
Credit: virtuosocentral.com
Configuring Computer Settings
Configuring your computer settings is crucial to ensure your XLR mic works properly. This step helps your computer recognize the mic and capture clear sound. Proper settings prevent issues like low volume or no sound at all. Follow the steps below to set up your computer correctly.
Selecting The Input Device
First, open your computer’s sound settings. Find the input or recording devices section. Select your XLR mic or audio interface from the list. This tells your computer to use the mic for sound input. Double-check the device is connected and powered on.
Adjusting Input Levels
Next, adjust the input volume. Set the level so the mic picks up your voice clearly. Avoid setting it too high to prevent distortion. Test by speaking and watching the input meter. Adjust until the sound is strong but not clipping.
Using Audio Software
Finally, use audio software to manage and improve your recordings. Programs like Audacity or GarageBand help monitor sound quality. Set the software to use your XLR mic as the input device. You can also add filters or effects for better sound.
Troubleshooting Common Issues
Troubleshooting common issues helps ensure your XLR mic works well with your computer. Problems like no sound, low volume, distortion, noise, or latency can affect your recording. Fixing these issues improves your audio quality and recording experience.
No Sound Or Low Volume
Check all cable connections first. Make sure the XLR cable is firmly plugged into the mic and audio interface.
Verify the interface is properly connected to your computer via USB or other ports. Check the mic gain and volume settings on the interface. Raise the gain if the sound is too low.
Confirm the computer recognizes the audio device in sound settings. Select the correct input device for recording in your software. Try using a different cable or port to rule out hardware faults.
Distortion And Noise
Reduce the mic gain if the sound distorts. High gain levels cause clipping and harsh noise.
Check for interference from nearby electronic devices. Move your mic and cables away from power supplies and routers.
Use balanced XLR cables to minimize noise. Avoid long cable runs without proper shielding.
Try different recording software or update drivers to fix software-related noise issues.
Latency Problems
Latency means a delay between speaking and hearing the sound. Lower the buffer size in your audio settings to reduce delay.
Close other programs that use CPU power. This frees resources for your audio software.
Update your audio interface drivers. Old drivers may cause latency or glitches.
Use direct monitoring if your interface supports it. This lets you hear the mic input without delay.
Credit: virtuosocentral.com
Tips For Better Audio Quality
Good audio quality makes a big difference when using an XLR mic with your computer. Small changes can improve your sound a lot. Focus on three key areas to get clear and crisp audio for recordings or calls.
Proper Mic Placement
Place the mic close to your mouth, about 6 to 12 inches away. This captures your voice clearly and reduces background noise. Avoid pointing the mic at loud devices or vents. Speak directly into the mic for best results.
Using Pop Filters And Shock Mounts
Pop filters stop harsh sounds like “p” and “b” from making noise in recordings. They help keep your voice smooth and clear. Shock mounts reduce vibrations from desk bumps or movements. Use both tools for cleaner, professional sound quality.
Room Acoustics And Soundproofing
Hard surfaces cause echoes and reflections. Soft materials like curtains, carpets, or foam panels absorb sound waves. Choose a quiet room with fewer echoes. Soundproofing limits outside noise, making your voice stand out clearly.

Credit: www.youtube.com
Frequently Asked Questions
How Do I Connect An Xlr Mic To A Computer?
To connect an XLR mic, use an audio interface with XLR input. Connect the mic to the interface, then link the interface to your computer via USB. This setup ensures high-quality audio and proper mic power.
Can I Use An Xlr To Usb Adapter Directly?
Yes, XLR to USB adapters work for simple connections. However, they may offer lower sound quality compared to a dedicated audio interface. Choose based on your audio needs and budget.
Do I Need Phantom Power For An Xlr Mic?
Phantom power is required for condenser XLR mics. Dynamic mics do not need phantom power. Ensure your audio interface or adapter provides 48V phantom power if using a condenser mic.
What Software Works With Xlr Mic Connections?
Most recording and streaming software supports XLR mics via interfaces. Popular options include Audacity, GarageBand, OBS Studio, and Adobe Audition. Choose software compatible with your operating system.
Conclusion
Connecting an XLR mic to a computer is easier than it seems. Use the right cable and an audio interface or adapter. Check your computer settings to make sure the mic works. Test the sound before any recording or call.
This simple setup helps you get clear audio every time. Keep your equipment clean and cables untangled for best results. Enjoy better sound for podcasts, music, or chats. Now, you know how to connect your XLR mic with confidence.
As an Amazon Associate, I earn from qualifying purchases.