
As an Amazon Associate, I earn from qualifying purchases.
Have you ever turned up your car stereo only to hear crackling, buzzing, or no sound at all? A blown speaker can ruin your driving experience and leave you frustrated.
But don’t worry—you don’t have to spend a fortune on repairs or replacements. You’ll learn simple, effective ways to fix blown speakers in your car. By the end, you’ll be back to enjoying clear, powerful sound on every drive. Keep reading, and let’s bring your music back to life!

Credit: www.wikihow.com
Signs Of Blown Car Speakers
Blown car speakers show clear signs that help identify the problem. Knowing these signs saves time and money. It also stops further damage to your car’s audio system. Spotting these signs early keeps your music clear and enjoyable. Here are the common signs of blown car speakers.
Distorted Sound Effects
Sounds lose their clarity and become fuzzy or unclear. Music may crackle or sound muffled. High notes may sound harsh or scratchy. Distortion happens even at low volume levels. This happens because the speaker’s internal parts are damaged.
No Sound Output
The speaker produces no sound at all. Audio may play through other speakers only. This means the blown speaker is not working. Sometimes, only one speaker stops working while others play fine. This is a strong sign of a blown speaker.
Rattling And Buzzing Noises
Unusual rattling or buzzing noises come from the speaker. These sounds change with the volume or music beats. The speaker cone may be loose or torn. This causes vibrations that create buzzing sounds. Rattling means the speaker’s structure is damaged.
Tools And Materials Needed
Fixing blown speakers in your car starts with having the right tools and materials. These items help you work safely and efficiently. Gather everything before you begin to avoid interruptions. The main tools include screwdrivers, pliers, a multimeter, and replacement parts. Each tool plays a key role in the repair process.
Screwdrivers And Pliers
Screwdrivers help remove screws holding the speaker and panel in place. A set with both flathead and Phillips heads works best. Pliers assist in gripping and pulling wires or connectors gently. They also help in bending or cutting wires if needed. Using the right tools reduces damage during removal.
Multimeter For Testing
A multimeter checks the electrical condition of your speaker wires and components. It measures voltage, resistance, and continuity. This tool helps identify if the speaker is truly blown or if wiring is the problem. Testing saves time and prevents unnecessary parts replacement.
Replacement Speaker Parts
Replacement parts include the speaker cone, voice coil, and wiring if damaged. Choose parts that fit your car’s make and model. Quality parts ensure better sound and longer life. Keep these ready before starting the repair for a smooth process.
Removing The Damaged Speaker
Removing the damaged speaker is the first step to fixing blown speakers in your car. This process requires care and attention. You must avoid causing more damage to your car’s interior or the audio system. Follow the steps carefully to remove the speaker without trouble.
Accessing The Speaker Panel
Start by locating the speaker panel in your car door or dashboard. Use a flat tool to gently pry the panel open. Avoid using too much force to prevent breaking clips or scratching surfaces. Keep track of screws or fasteners holding the panel. Set them aside safely for reassembly.
Disconnecting Speaker Wires
Once the panel is open, find the wires connected to the speaker. Carefully unplug the connectors by pressing the tabs or gently pulling them apart. Do not pull on the wires directly to avoid damage. Label the wires if needed to remember their correct positions.
Safely Taking Out The Speaker
After disconnecting the wires, remove screws or bolts securing the speaker. Hold the speaker firmly and pull it out slowly. Check for any remaining attachments before fully removing it. Place the damaged speaker aside in a safe spot for disposal or repair.
Testing The Speaker
Testing the speaker is a key step to find out if it is really blown. This helps you avoid unnecessary replacements and saves money. You can check the speaker’s condition with simple tools and easy methods.
Checking Speaker Continuity
Continuity shows if the speaker coil is broken or complete. Use a simple continuity tester or a multimeter on the continuity setting. Place the probes on the speaker terminals. A beep or low resistance means the coil is intact. No beep or infinite resistance means the coil is broken.
Using A Multimeter
A multimeter measures resistance in ohms. Set the multimeter to the lowest ohm range. Touch the probes to the speaker terminals. A normal speaker shows resistance between 3 to 8 ohms. If the reading is zero or very high, the speaker is faulty. This method quickly tells if your speaker is working.
Confirming Speaker Damage
Besides electrical tests, listen to the speaker sound. Distorted, buzzing, or no sound means damage. Visually inspect the speaker cone for tears or holes. Damage to the cone or coil usually means the speaker needs repair or replacement. Testing confirms the problem before fixing it.
Repairing Vs Replacing Speakers
Deciding between repairing and replacing blown car speakers can be tricky. Both options have pros and cons. Understanding these helps you choose the best path for your situation.
Repairing speakers can save money and keep the original sound quality. Replacing speakers often means better performance but at a higher cost. Knowing when to repair or replace is key to fixing your car audio quickly and effectively.
When To Repair
Repair speakers if damage is minor. Small tears in the cone or loose wires can be fixed. Repair works well if the speaker frame is still strong. Choose repair to keep the original speaker’s tone and quality. Repair also suits those with limited budgets.
When Replacement Is Necessary
Replace speakers if damage is severe. Big tears, broken cones, or melted voice coils need new parts. Old speakers with poor sound quality should be replaced. Replacement is best when repair costs are close to new speakers. New speakers often improve sound and last longer.
Cost And Time Considerations
Repairing usually costs less but takes time. Finding parts and doing the fix may need skill. Replacement costs more but saves time. Installing new speakers is often faster and simpler. Balance cost and time to decide what suits your needs best.
Step-by-step Speaker Repair Guide
Fixing blown speakers in your car can seem hard. This step-by-step guide breaks down the repair process. Follow each step carefully to bring your speakers back to life. You only need some basic tools and a bit of patience.
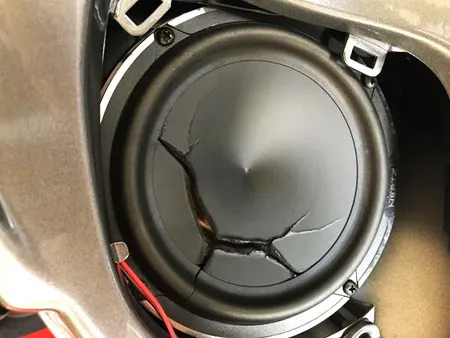
Fixing Torn Speaker Cones
Start by inspecting the speaker cone. Look for rips or tears on the surface. Small tears can be repaired with glue. Use a thin layer of white glue or rubber cement. Spread it gently over the tear with a small brush. Let it dry completely before testing the speaker. For large tears, consider using a patch. Cut a piece of thin paper or fabric slightly bigger than the tear. Glue the patch over the damaged area. Allow it to dry well to avoid sound distortion.
Reattaching Loose Components
Loose parts inside the speaker cause rattling sounds. Check the voice coil and spider for movement. If loose, apply a small amount of glue to secure them. Do not use too much glue as it can block movement. Press the parts gently until the glue sets. Allow several hours for the glue to harden. Avoid moving the speaker during this time. This step helps restore clear sound and stops buzzing noises.
Sealing And Reinforcing
Seal any gaps around the speaker frame. Use silicone sealant or weatherproof glue. This prevents air leaks that reduce sound quality. Apply a thin bead of sealant along the edges. Smooth it out with a finger or tool. Let the sealant cure fully before reinstalling. Reinforce weak spots with tape or extra glue. This adds durability and protects the speaker cone. Proper sealing and reinforcing improve speaker lifespan and sound.
Installing New Speakers
Installing new speakers can bring fresh sound to your car. It improves audio quality and restores full volume. This step-by-step guide helps you replace blown speakers easily. Follow simple tips for a smooth installation and better listening.
Choosing Compatible Models
Pick speakers that fit your car’s size and power needs. Check the speaker size by measuring old speakers. Match the speaker’s power rating with your car stereo. Choose speakers with good sound quality and durability. Avoid models that need extra parts or changes.
Wiring And Connections
Turn off your car before handling wires. Identify positive and negative wires from the old speaker. Use the same wires for the new speaker to keep sound clear. Connect wires firmly to avoid loose sound or damage. Use electrical tape or connectors to protect wire joints.
Securing The Speaker In Place
Place the new speaker into the original slot. Align screw holes and tighten screws evenly. Do not overtighten; it may damage the speaker frame. Check that the speaker sits flat and stable. Test the speaker by playing audio before closing panels.

Credit: www.youtube.com
Testing Sound After Repair
After fixing blown speakers in your car, testing the sound is crucial. It shows if the repair worked well. Testing helps find small problems early. It ensures you get clear and balanced sound while driving. Follow simple steps to check and adjust audio settings. Listen closely for sound quality. Fix any issues that remain to enjoy great audio again.
Adjusting Audio Settings
Start by turning on your car stereo. Set the volume to a medium level. Adjust bass, treble, and balance controls. Make sure the sound is even on both sides. Use preset equalizer settings if available. Small tweaks can improve the speaker’s sound. Avoid very high bass or treble settings. They may stress the repaired speakers.
Listening For Sound Quality
Play different music styles to test speakers. Listen for clear vocals and balanced instruments. Check if any sound is distorted or crackling. Notice if any speaker sounds weaker or louder. Good speakers produce clean, smooth sound. Sudden pops or static show problems. Quiet background sounds should be soft and natural.
Troubleshooting Remaining Issues
If sound problems continue, check speaker connections again. Loose wires can cause bad sound. Inspect the speaker cone for damage. Replace parts if needed. Test the audio source and cables. Sometimes the problem is not the speaker. Repeat adjustments to audio settings. Take your time to find the issue.
Preventing Future Speaker Damage
Keeping your car speakers safe from damage saves money and keeps sound clear. Preventing future speaker damage means taking simple steps. These steps stop issues before they start. Follow easy tips to keep your speakers working well for a long time.
Avoiding Overpowering
Too much power can blow your speakers quickly. Use an amplifier that matches your speaker’s power rating. Check your car stereo settings to avoid sending too much power. Overpowering causes distortion and permanent damage. Keep your system balanced for safe sound.
Regular Maintenance Tips
Clean your speakers often to avoid dust build-up. Dust can block sound and harm parts inside. Check speaker wiring regularly for loose connections or frays. Fix problems early to stop bigger damage. Listen for changes in sound quality as a sign to inspect your speakers.
Proper Volume Levels
Keep volume at a moderate level during drives. High volume strains speaker cones and wiring. Avoid sudden loud bursts of sound that shock your speakers. Use volume controls gently to extend speaker life. Clear sound comes from careful volume management.
Credit: www.arloren.com
Frequently Asked Questions
How Do I Know If My Car Speaker Is Blown?
A blown speaker often produces distorted or no sound. You may hear buzzing, crackling, or a weak output. Checking with another speaker or testing the audio system can confirm the issue quickly.
Can I Fix A Blown Car Speaker Myself?
Yes, minor issues like loose wires or damaged cones can be fixed. However, severe damage may require professional help or speaker replacement for best results.
What Tools Are Needed To Fix Blown Car Speakers?
Basic tools include a screwdriver, wire stripper, multimeter, and soldering iron. These help in removing the speaker, testing electrical connections, and repairing wiring efficiently.
How Much Does It Cost To Repair Blown Car Speakers?
Repair costs vary between $20 to $100 depending on the damage. Replacing speakers typically costs more but ensures better sound quality and longevity.
Conclusion
Fixing blown car speakers can improve your driving experience. Start by checking the speaker wires and connections carefully. Replace damaged parts with the right tools and materials. Take your time to avoid making mistakes. Remember, small fixes can bring back clear sound.
Keep your car audio system in good shape by regular care. Enjoy music without annoying crackles or silence. Stay patient, and your speakers will sound great again. Simple steps lead to better sound quality on the road.
As an Amazon Associate, I earn from qualifying purchases.

