Have you ever wanted to share your computer’s audio directly through your microphone? Whether you’re streaming, recording, or just chatting with friends, playing your computer’s sound through your mic can make a huge difference.
It might sound tricky, but once you know how, it’s surprisingly simple and powerful. In this guide, you’ll discover easy steps that anyone can follow to get your computer audio playing through your mic perfectly. Ready to level up your audio game?
Let’s dive in!

Credit: www.amazon.com
Set Up Virtual Audio Cable
Setting up a virtual audio cable is key to playing computer audio through your microphone. This tool creates a virtual connection between your computer’s sound output and the microphone input. It helps send audio from your speakers directly to your mic channel. Follow these simple steps to set it up correctly.
Download And Install Software
First, download the Virtual Audio Cable software from a trusted site. Choose the version that fits your operating system. Run the installer and follow the on-screen instructions. The installation process is quick and easy. After installation, restart your computer to apply the changes.
Configure Virtual Audio Cable
Open the Virtual Audio Cable control panel. Create a new virtual cable by clicking the “Add Cable” button. Adjust the cable settings if needed, but default values usually work well. This cable will act as a bridge for your audio. Remember the cable number for later steps.
Select Cable As Default Playback Device
Go to your computer’s sound settings. Find the playback devices list and select the virtual cable you created. Set it as the default playback device. This action sends all sound output through the virtual cable. Now your microphone can pick up the computer audio easily.
Credit: battledental.com
Adjust Microphone Settings
Adjusting your microphone settings is key to playing computer audio through your mic. It lets your system share audio from your computer instead of just your voice. This process requires a few simple steps in the sound settings. Follow along to set it up right.
Open Sound Control Panel
Start by opening the Sound Control Panel on your PC. Type “Sound” in the Windows search bar and select the Control Panel result. This panel manages all audio devices and settings. It shows playback and recording devices linked to your computer.
Enable Stereo Mix Or Virtual Input
Look for the “Recording” tab inside the Sound Control Panel. Right-click in the device list and check “Show Disabled Devices.” Find “Stereo Mix” or any virtual audio input available. Right-click it and choose “Enable.” This option allows your system to capture all sounds playing on the computer.
Set Virtual Input As Microphone Source
After enabling Stereo Mix or a virtual input, select it and click “Set Default.” This sets the virtual input as your main microphone source. Programs using the microphone will now hear your computer’s audio. You can test it by playing sound and watching the input levels move.
Use Audio Mixing Software
Using audio mixing software helps you play computer sound through your microphone. This method combines your computer audio and microphone input into one signal. It allows clear sound sharing for calls, recordings, and live streams. The process requires a mixing application and some setup. Follow these steps for a smooth experience.
Choose Suitable Mixing Application
Pick a mixing app that fits your needs and skill level. Popular choices include VoiceMeeter, Virtual Audio Cable, and OBS Studio. These apps work on Windows and Mac. Look for software with good reviews and easy interfaces. Free options are available and work well for beginners. Make sure the app supports routing audio to your microphone device.
Route Audio Through Mixer
Open the mixing software and add your audio sources. Include your system sound and microphone input. Route the system sound to the virtual microphone channel. This channel acts as the microphone device for other apps. Adjust settings to send both sounds together. Test the audio to confirm it plays through the mic correctly.
Control Volume And Balance
Use the mixer controls to set the right volume levels. Balance your microphone voice and computer sounds clearly. Avoid making any source too loud or too quiet. Proper balance improves sound quality and listener experience. Adjust settings during use to maintain clear audio. This step ensures smooth and natural sound transmission.
Test Audio Transmission
Testing audio transmission is a key step when playing computer audio through the mic. It helps to ensure the sound is clear and works well with other apps. This step lets you find any problems early. This way, you can fix them before using the setup live.
Use Voice Chat Applications
Open a voice chat app like Discord or Skype. Start a voice call or join a test channel. Speak or play the audio through your mic. Ask a friend to listen or use the app’s test feature. This shows how your audio sounds to others.
Check Audio Quality
Listen carefully to the sound during the test. Check for clarity, volume level, and any background noise. Make sure the audio is not too loud or too soft. Clear sound means your setup works well. Poor quality means you need adjustments.
Troubleshoot Common Issues
If the audio is unclear or missing, check your settings. Confirm the correct input device is selected in your app. Lower the mic volume if the sound is too loud or distorted. Restart the app or computer if problems continue. Test again after each change.
Optimize Audio Settings
Optimizing your audio settings is key to playing computer sound through your microphone clearly. Good settings help avoid noise, delays, and poor sound quality. Adjusting these settings improves your listening and sharing experience.
Adjust Sample Rate And Bit Depth
Sample rate controls how often sound is captured per second. Bit depth affects how detailed each sound sample is. Set your audio device to 44100 Hz or 48000 Hz sample rate. Choose 16-bit or 24-bit depth for better sound quality. This setting reduces distortions and makes audio smooth.
Reduce Echo And Feedback
Echo and feedback create annoying sounds during playback. Use noise suppression or echo cancellation features in your audio settings. Lower microphone sensitivity to avoid picking up loud sounds twice. Place your microphone away from speakers to stop sound loops.
Enhance Sound Clarity
Clear sound is easier to understand and share. Enable noise reduction to remove background noise. Use equalizer settings to balance bass and treble. Keep volume levels steady to avoid sudden loud sounds. These steps make your audio crisp and clean.
Alternative Methods
Playing computer audio through your microphone can be done in many ways. Some methods are simple and use basic tools. Others need special devices or software. These alternative methods help you share your audio clearly during calls or recordings.
Use Physical Audio Cable Loopback
This method uses a physical cable to connect your computer’s audio output to its microphone input. You need a 3.5mm male-to-male audio cable. Plug one end into the headphone jack. Plug the other into the microphone jack. This creates a loop that sends sound directly to the mic channel.
It works well for desktops with separate jacks. Adjust sound settings to prevent feedback. This method is simple and cheap. No extra software is needed.
Employ Dedicated Audio Interfaces
Audio interfaces are devices designed for sound management. They let you connect instruments, microphones, and computers. Many interfaces have loopback features. This allows you to route computer audio through the microphone channel digitally.
Interfaces improve sound quality and reduce delay. They are popular among podcasters and streamers. Setup is easy with included software. Interfaces cost more but offer professional results.
Explore Third-party Software Solutions
Software can simulate microphone input using computer audio. Apps like VoiceMeeter or Virtual Audio Cable create virtual audio devices. You select these devices as your mic in apps or games. The software mixes and routes sound internally.
This method requires installation and basic setup. It works on most Windows systems. Software solutions offer flexibility and control. They are free or low-cost options for many users.
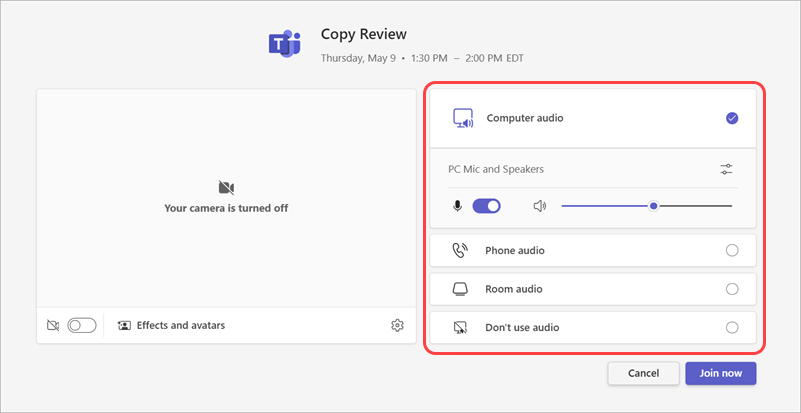
Credit: support.microsoft.com
Frequently Asked Questions
How Can I Play Computer Audio Through Mic?
You can use virtual audio cable software to route computer audio to your mic input. It creates a virtual mic device for audio sharing.
Is It Possible To Use Built-in Windows Features?
Yes, Windows has “Stereo Mix” that can capture system audio. Enable it in Sound settings to play audio through mic.
What Software Works Best For Audio Routing?
Popular tools include VB-Audio VoiceMeeter and Virtual Audio Cable. They offer easy setup and smooth audio routing for mic input.
Can I Use This Method For Online Meetings?
Absolutely. Routing audio through mic lets you share system sounds during video calls or live streams without extra hardware.
Conclusion
Playing computer audio through your mic is simple with the right steps. You just need to set up your sound settings carefully. This lets others hear your computer sounds clearly during calls or streams. Practice a few times to get the balance right.
Small changes can make a big difference in sound quality. Keep your software updated to avoid problems. Now, you can share music, games, or videos easily. Enjoy clear and smooth audio every time you use your mic.
As an Amazon Associate, I earn from qualifying purchases.