
Are you facing problems with your Acer laptop? Maybe it’s running slow, showing errors, or just not working like it used to.
Resetting your Acer laptop to factory settings can often fix these issues and give you a fresh start. But if you’re unsure how to do it safely and without losing important data, don’t worry—you’re in the right place. This guide will walk you through simple, clear steps to reset your Acer laptop quickly and confidently.
Keep reading to learn how to bring your laptop back to its original state and enjoy smooth performance again.
Credit: www.easeus.com
Prepare For Reset
Save all important files like documents, photos, and videos. Use a USB drive, external hard disk, or cloud storage for backup. This step protects your data from being lost during reset.
Charge your laptop fully before starting the reset process. A low battery can stop the reset and cause problems. Plug in your charger to keep power steady.
Remove all external devices such as USB sticks, printers, or headphones. These can interrupt the reset process or cause errors. Keep the laptop clear of extras until reset ends.
Credit: www.aiseesoft.com
Access Recovery Options
Use Windows Settings to start the reset process. Open Settings, go to Update & Security, then choose Recovery. Click Get started under Reset this PC. Follow the simple steps to reset your Acer laptop.
To boot into Advanced Startup, press and hold Shift while clicking Restart. This opens a menu with recovery options. Select Troubleshoot, then Reset this PC. This method helps if Windows does not start normally.
Acer Recovery Management is a tool made for Acer laptops. Find it in the Start menu or search bar. Open it and choose Restore or Factory Reset. Follow the on-screen instructions for a full reset.
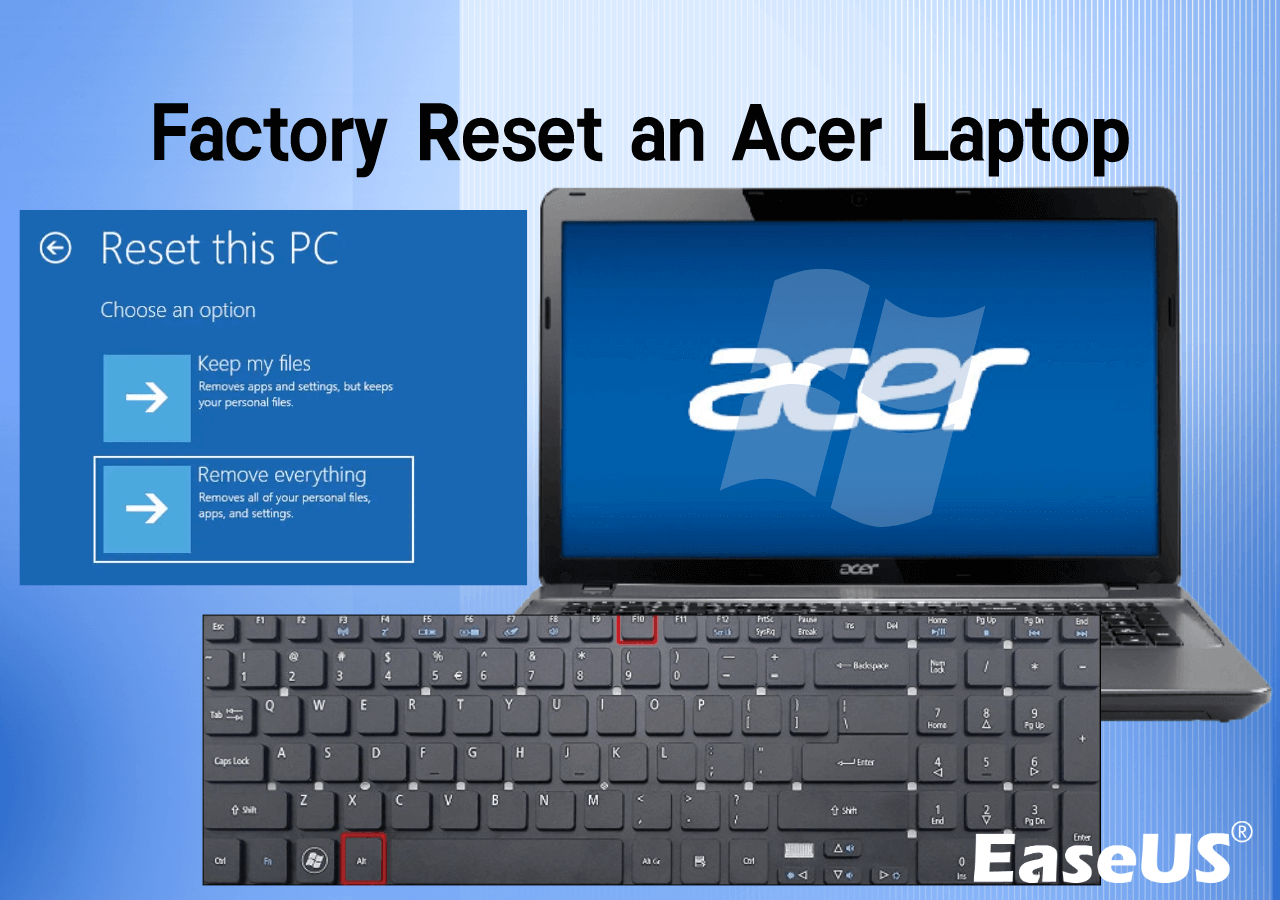
Reset Using Windows Settings
Start by clicking the Start menu and open Settings. Choose Update & Security, then select Recovery from the left panel. Find the Reset this PC section and click Get started.
Next, pick one of the reset options: Keep my files or Remove everything. The first saves your personal files but removes apps and settings. The second erases all data and apps, giving a fresh start.
After choosing, follow the on-screen instructions. Confirm your choice and click Reset to begin. The laptop will restart and start the reset process. This may take some time. Keep the laptop plugged in during this step.
Reset Via Acer Recovery Management
First, open Acer Recovery Management on your laptop. You can find it by typing the name in the search bar. Next, click on the Factory Reset option. This will start the process to restore your laptop to its original settings.
Follow the on-screen instructions carefully. The system will guide you step-by-step. This process may take some time, so keep your laptop plugged in. Your files might be deleted, so back them up before starting.
Reset From Advanced Startup
Restart your Acer laptop. While it starts, press the F8 or Shift + F8 keys repeatedly. This opens the Advanced Startup Menu. Choose Troubleshoot from the options. Then select Reset this PC to start the factory reset process. Follow the on-screen instructions to confirm your choice. You can choose to keep your files or remove everything for a fresh start. The reset will take some time. The laptop will restart several times. Wait patiently until it finishes. After completion, your Acer laptop will be like new from the factory.
Credit: www.youtube.com
Troubleshooting Reset Issues
Reset Fails to Start can happen if the laptop has corrupted files. Try restarting the computer and running the reset again. Make sure the laptop is plugged into power to avoid interruptions.
System Recovery Partition Missing means the laptop cannot find the files to reset itself. This can occur if the partition was deleted or damaged. Using a recovery USB or DVD created earlier helps to restore the system.
Alternative Reset Methods include using Windows settings or Acer recovery tools. Access the reset option through Settings > Update & Security > Recovery. If this fails, download recovery software from Acer’s website or contact support for help.
After Reset Setup
After resetting your Acer laptop, start the initial setup. Choose your language, region, and keyboard layout. Connect to a Wi-Fi network to continue. Create or sign in with a Microsoft account for easy access to apps and settings. Set up privacy options as you prefer.
Next, reinstall applications you need for work or fun. Use the Microsoft Store or install from saved files. Remember to download only trusted apps to keep your laptop safe.
Finally, restore backed-up files to get your important documents and photos back. Use an external drive or cloud storage where you saved your backup. This helps you pick up right where you left off.
Frequently Asked Questions
How Do I Backup Data Before Acer Factory Reset?
Always backup important files to an external drive or cloud storage. This prevents data loss during the reset process. Use Acer’s built-in backup tools or manual copy methods for safety.
What Are The Steps To Reset Acer Laptop To Factory Settings?
Restart your Acer laptop and press Alt + F10 during boot. Select “Troubleshoot,” then “Reset this PC. ” Choose to keep or remove files and follow on-screen instructions.
Will Factory Reset Remove All Personal Files On Acer Laptop?
Yes, a full factory reset deletes all personal files and apps. Choose “Remove everything” for a clean reset or “Keep my files” to retain personal data.
How Long Does Acer Laptop Factory Reset Usually Take?
The reset process typically takes 30 to 60 minutes. Time varies based on your laptop’s speed and the amount of data being erased.
Conclusion
Resetting your Acer laptop to factory settings helps fix many issues. It erases all data and returns the system to its original state. Back up important files before you start. Follow the steps carefully for a smooth reset process. After the reset, your laptop will feel fresh and clean.
You can set it up just like new. This method is useful for improving speed and solving software problems. Keep this guide handy for future reference. Taking control of your device is easier than you think.
As an Amazon Associate, I earn from qualifying purchases.

