
Have you ever needed to capture exactly what’s on your Acer laptop screen but didn’t know how? Whether it’s saving an important message, sharing a cool image, or troubleshooting an issue, taking a screenshot is a simple skill that can save you time and frustration.
In this guide, you’ll discover easy, step-by-step methods to screenshot on your Acer laptop—no tech expertise required. Keep reading, and you’ll be capturing your screen like a pro in no time!
Capture Screen With Print Screen Key
Capturing your screen on an Acer laptop is simple with the Print Screen key. This key allows you to take a snapshot of your entire screen or active window. You can save or share the image quickly after copying it. This method does not require extra software and works on most Windows systems.
Locate The Print Screen Key
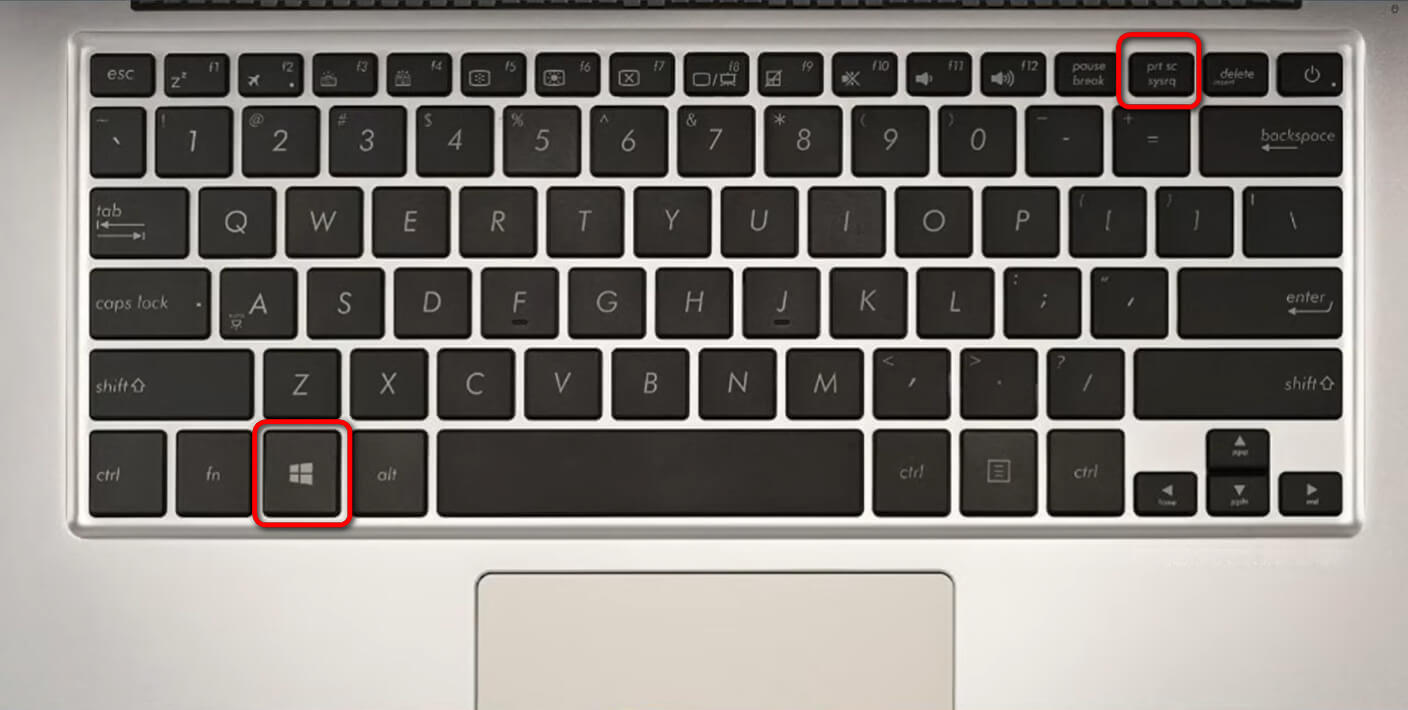
The Print Screen key is usually labeled as “PrtSc,” “PrtScn,” or “Prt Scr.” Find it on the top row of your keyboard, near the function keys. It might be near the “F12” key or the “Delete” key. On some Acer laptops, you may need to press the “Fn” key along with Print Screen to capture the screen.
Copy And Paste Screenshots
Press the Print Screen key to copy your screen image. The screenshot is saved to your clipboard, not as a file. Open an app like Paint or Word. Press “Ctrl + V” to paste the screenshot. You can then save the image or edit it as needed. This method is fast and easy for sharing screen captures.
Use Snipping Tool For Custom Shots
The Snipping Tool on Acer laptops lets you capture custom screenshots easily. It gives you control over what part of the screen you want to save. This tool is simple and great for detailed shots or specific areas.
You can choose different snip styles to match your needs. After capturing, you can edit and save your snip quickly. It is a handy tool for clear and precise screenshots.
Open Snipping Tool
Click the Start button on your Acer laptop. Type “Snipping Tool” in the search box. Select the Snipping Tool app from the results. The tool opens with a small window ready to use.
Choose Snip Types
Click the “Mode” or “New” button in the tool. Pick a snip type: Free-form, Rectangular, Window, or Full-screen. Free-form lets you draw any shape. Rectangular captures a box area. Window captures a single window. Full-screen grabs the whole screen.
Save And Edit Snips
After taking a snip, it appears in the Snipping Tool window. Use the pen or highlighter to mark important parts. Click the save icon to store your screenshot. Choose a folder and file name. Your custom screenshot is ready to use.
Try Snip & Sketch For Quick Edits
Snip & Sketch is a handy tool for taking screenshots on your Acer laptop. It lets you capture your screen quickly and edit the image right away. You can add notes, draw shapes, or highlight parts of the screenshot. This tool saves time and helps you share clear images with others.
Launch Snip & Sketch
Press the Windows key and type “Snip & Sketch” in the search box. Click the app to open it. You can also use the shortcut keys Windows + Shift + S. The screen will dim, and a small menu appears at the top. Choose a snip shape: rectangular, freeform, window, or full screen. The screenshot will copy to your clipboard and open in Snip & Sketch.
Annotate And Share Screenshots
After taking a screenshot, use the tools to draw or write on the image. You can use the pen, pencil, or highlighter. Change colors or erase mistakes easily. Once done, save the image to your computer. You can also share it directly by clicking the share icon. Send the screenshot via email or social media quickly.
:max_bytes(150000):strip_icc()/A1-ScreenshotonanAcerLaptop-annotated-94fac10127934711888db26ef9a7c4b7.jpg)
Credit: www.lifewire.com
Keyboard Shortcuts For Partial Screenshots
Taking partial screenshots on an Acer laptop saves time and captures only the important parts. Keyboard shortcuts make this task quick and easy. You can select a specific area on your screen without editing later.
This method is perfect for capturing images, text, or sections of a website. It avoids clutter and keeps your screenshots clean and focused.
Windows + Shift + S Shortcut
Press the Windows, Shift, and S keys together. The screen will dim slightly. A small menu appears at the top with different screenshot options. This shortcut opens the Snip & Sketch tool instantly.
This tool lets you capture a rectangular area, freeform shape, window, or full screen. The selected area copies to the clipboard automatically. You can paste it into any app or document.
Select And Capture Specific Areas
After pressing Windows + Shift + S, use your mouse to drag and select the area you want. The selection shows as a highlighted box. Release the mouse button to capture.
The screenshot saves to the clipboard. You can paste it by pressing Ctrl + V. To save the image, open an app like Paint or Word and paste it there. Then, save the file on your laptop.
Use Acer-specific Screenshot Features
Acer laptops often come with special tools for taking screenshots. These tools make capturing your screen easy and fast. Using Acer-specific features can save time and effort. They also offer options not found in standard screenshot methods.
Explore these features to take better screenshots on your Acer laptop. The following sections explain how to use built-in Acer apps and enable hotkeys for quick captures.
Check Acer Utility Apps
Acer includes utility apps that help with screenshots. One popular app is Acer Quick Access. This app may have a screenshot function built-in. Open the app to see if it offers screen capture tools.
Some models also include Acer Screen Capture or Acer Capture Manager. These apps provide options like full screen, window, or custom area capture. Check your app list for any Acer screen tools. Using these apps can simplify screenshot tasks.
Enable Hotkeys For Screenshots
Acer laptops often support hotkeys for screenshots. These are keyboard shortcuts that save time. Common hotkeys include pressing the Fn key plus another key. For example, Fn + PrtSc captures the whole screen.
Check your laptop manual or Acer support site for exact key combinations. Some models let you enable or disable these hotkeys in settings. Turn them on to capture screens quickly without opening apps.
Hotkeys can save screenshots directly to a folder or clipboard. This makes sharing or editing images easier. Using hotkeys is a fast way to capture your screen on Acer laptops.
Save And Organize Screenshots Efficiently
Saving and organizing screenshots on your Acer laptop helps keep your files neat. It also makes finding images faster. Good habits reduce clutter and save time. Setting clear rules for saving files improves your workflow.
Choose Default Save Locations
Pick a default folder to save all screenshots. This avoids confusion about where files go. The Pictures folder or Desktop are easy options. You can change the save location in your screenshot tool settings. This keeps all your images in one place. Accessing your screenshots becomes quick and simple.
Organize Screenshots By Date And Folder
Create folders with dates to sort your screenshots. For example, use folders named by year and month. This method helps find images from specific times. You can also group screenshots by topic or project. Clear folder names make navigation easier. Regularly move new screenshots into the right folders. This keeps your storage clean and easy to use.
Troubleshooting Screenshot Issues
Troubleshooting screenshot issues on an Acer laptop can save time and reduce frustration. Screenshots may fail for simple reasons. Most problems have easy fixes. This section helps identify common issues and provides clear solutions. Follow these tips to capture your screen smoothly again.
Print Screen Not Working
The Print Screen key might not work due to software conflicts. Check if the key is disabled in your settings. Try pressing Fn + PrtSc together, as some Acer models require this. Restart your laptop to clear temporary glitches. Update your keyboard driver from the device manager. Use the Snipping Tool or Snip & Sketch app as alternatives. These tools often bypass Print Screen problems.
Missing Screenshot Files
Screenshots may save to unexpected folders. The default location is the Pictures > Screenshots folder. Search your computer for files ending with .png or .jpg. Ensure you have permission to save files in that folder. Check if antivirus software blocks file creation. Use the Snip & Sketch app to choose save location manually. Regularly organize your screenshots to avoid confusion.
Credit: www.pdfgear.com

Credit: www.wikihow.com
Frequently Asked Questions
How Do I Take A Screenshot On An Acer Laptop?
Press the “PrtSc” key to capture the whole screen. Then, paste it into an image editor like Paint and save it.
Can I Screenshot Only A Part Of My Acer Screen?
Yes, press “Windows + Shift + S” to open Snip & Sketch. Select the area you want to capture.
Where Are Screenshots Saved On Acer Laptops?
Screenshots taken with “Windows + PrtSc” are saved automatically in the “Screenshots” folder inside “Pictures. “
How To Screenshot On Acer Without Using The Keyboard?
Use the Snipping Tool app. Open it, select the mode, capture the screen, and save the screenshot easily.
Conclusion
Taking screenshots on your Acer laptop is simple and quick. Use the Print Screen key or Snipping Tool for easy captures. Save images where you can find them fast. Practice these steps to get comfortable with the process. Screenshots help share information clearly and save important details.
Keep these methods in mind for any future needs. You can capture your screen anytime without stress. Try these tips today and see how handy they are.
As an Amazon Associate, I earn from qualifying purchases.

