
Wiring a backup camera might sound tricky, but it doesn’t have to be. Imagine having a clear view behind your vehicle every time you reverse—no more guessing or risking accidents.
If you want to make your driving safer and easier, this guide is for you. You’ll learn simple steps to connect your backup camera quickly, even if you’re not a tech expert. Keep reading, and by the end, you’ll have the confidence to install your own camera and enjoy peace of mind every time you back up.
Choosing The Right Backup Camera
Choosing the right backup camera is the first step to better safety while reversing. The right camera gives a clear view of what is behind your vehicle. It helps prevent accidents and protects pedestrians and property. Picking the best camera depends on your car type, budget, and what features you want.
Types Of Backup Cameras
There are several types of backup cameras. The most common is the wired camera. It connects directly to your car’s display. Wireless cameras send the video signal without cables. They are easier to install but may face interference. Some cameras have a wide-angle lens to show a larger area. Others offer night vision for dark conditions. Choose a type that fits your needs and car model.
Factors To Consider
Camera resolution is important. Higher resolution means clearer images. Look for a camera with at least 480p quality. The camera’s size and shape matter. It should fit your car’s design without blocking anything. Check if the camera has water resistance for outdoor use. The view angle should be wide enough to see blind spots. Also, consider the ease of installation and connection type.
Tools And Materials Needed
Gather tools before starting the wiring process. You will need a drill to make holes if needed. Screwdrivers help secure the camera in place. Electrical tape and wire connectors are useful for safe wiring. A multimeter can test your connections. Also, have zip ties to keep wires neat and secure. Having all tools ready makes the installation smoother and faster.
Preparing Your Vehicle
Preparing your vehicle is the first step to install a backup camera. This part helps you get ready and avoid mistakes. You will need to find power, access the back, and follow safety rules. Each step is important for a smooth process.
Locating The Power Source
Find a power source that turns on with the car. The reverse light wiring is a good choice. It powers the camera only when you reverse the vehicle. Use a test light or multimeter to check the wires. Make sure the wire you choose gives 12 volts when reversing.
Accessing The Rear Of The Vehicle
Open the trunk or tailgate to reach the rear area. Remove panels or covers carefully to see the inside. You will need space to run the camera wires. Check for any wires or parts that can block your work. Keep the area clean and clear before starting.
Safety Precautions
Disconnect the vehicle battery before working on electrical parts. Wear gloves to protect your hands from sharp edges. Avoid loose clothing that can catch on parts. Use tools with insulated handles to prevent shocks. Work in a well-lit space to see clearly.
Installing The Backup Camera
Installing a backup camera requires careful steps to ensure clear views and safe driving. This section guides you through the key parts of the installation. Follow each step to set up your camera correctly.
Mounting The Camera
Choose a spot near the rear license plate for the camera. Clean the surface well to help the camera stick firmly. Use screws or adhesive mounts as per your camera type. Align the camera to get the best view behind your vehicle. Double-check the angle before tightening the screws.
Routing The Wires
Run the camera wires through the trunk or tailgate. Avoid places where wires can get pinched or damaged. Use existing holes or gaps to pass the wires inside the vehicle. Keep the wires away from moving parts or hot areas. Make sure the wire length is enough to reach the monitor or power source.
Securing The Cables
Use zip ties to bundle and secure the wires neatly. Attach the cables to the vehicle frame or panels to prevent movement. Avoid loose wires that might catch on objects or cause noise. Check all connections are tight and protected from water. Proper cable management helps keep your installation safe and tidy.
Credit: forum.dudu-auto.com
Connecting The Wiring
Connecting the wiring is a key step in installing a backup camera. It links the camera to your vehicle’s power and display. Proper wiring ensures the camera works every time you reverse.
Follow these steps carefully. Double-check connections for safety and performance. Clear wiring paths prevent damage and signal loss.
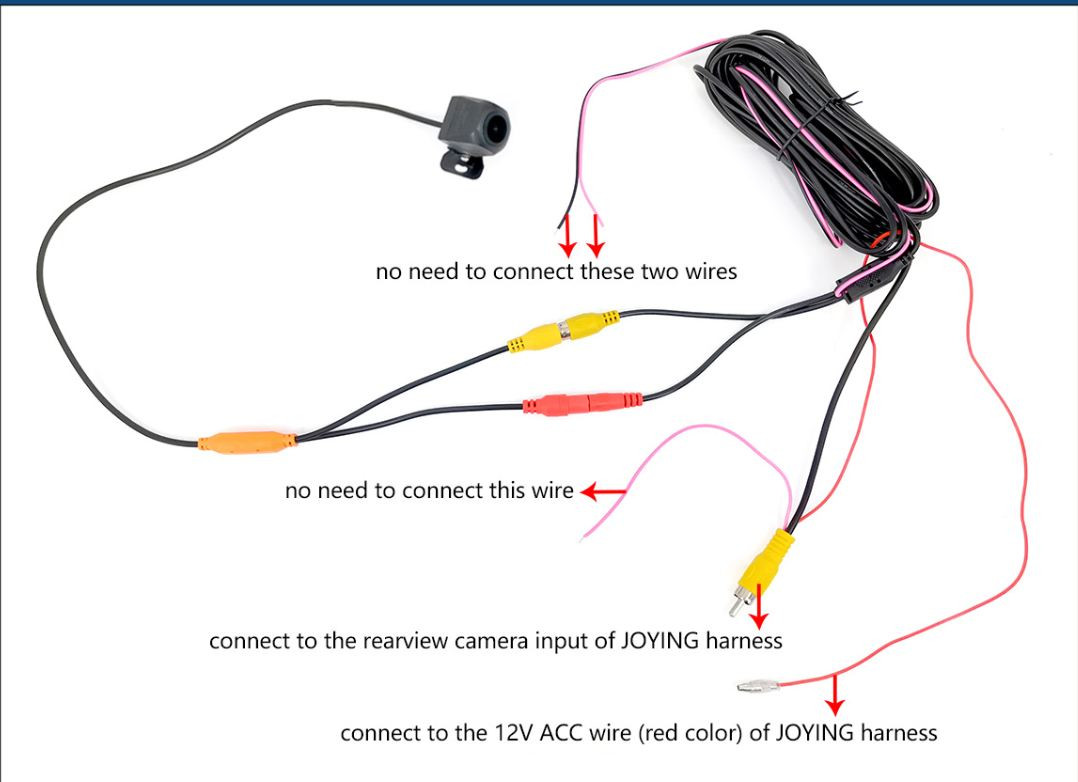
Wiring To Reverse Light
Find the reverse light wires at the back of your vehicle. These wires power the camera only when reversing. Use a test light or multimeter to identify the positive and negative wires.
Connect the camera’s power wires to the reverse light wires. The camera usually has a red wire for power and a black wire for ground. Secure the connections with wire taps or electrical tape.
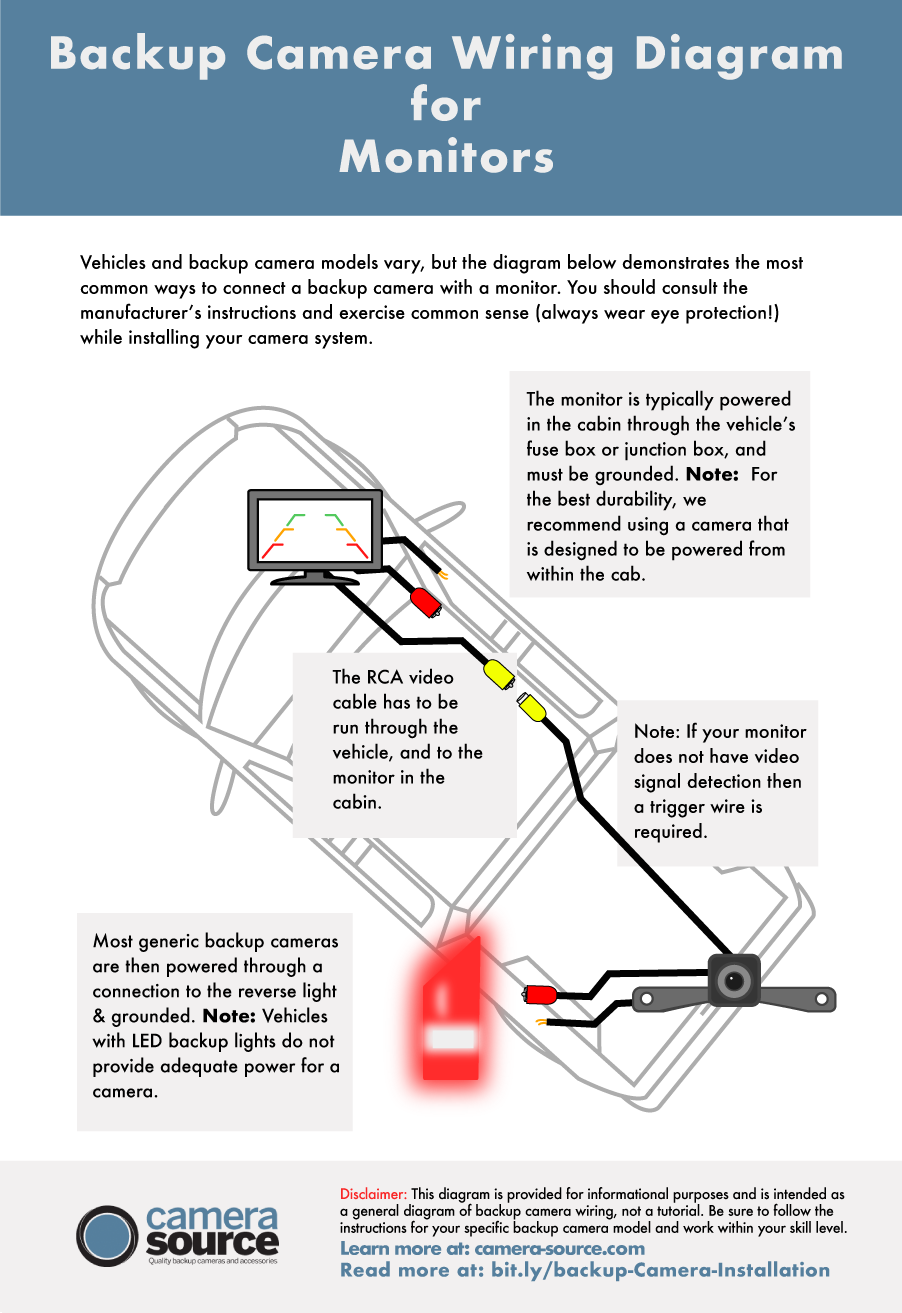
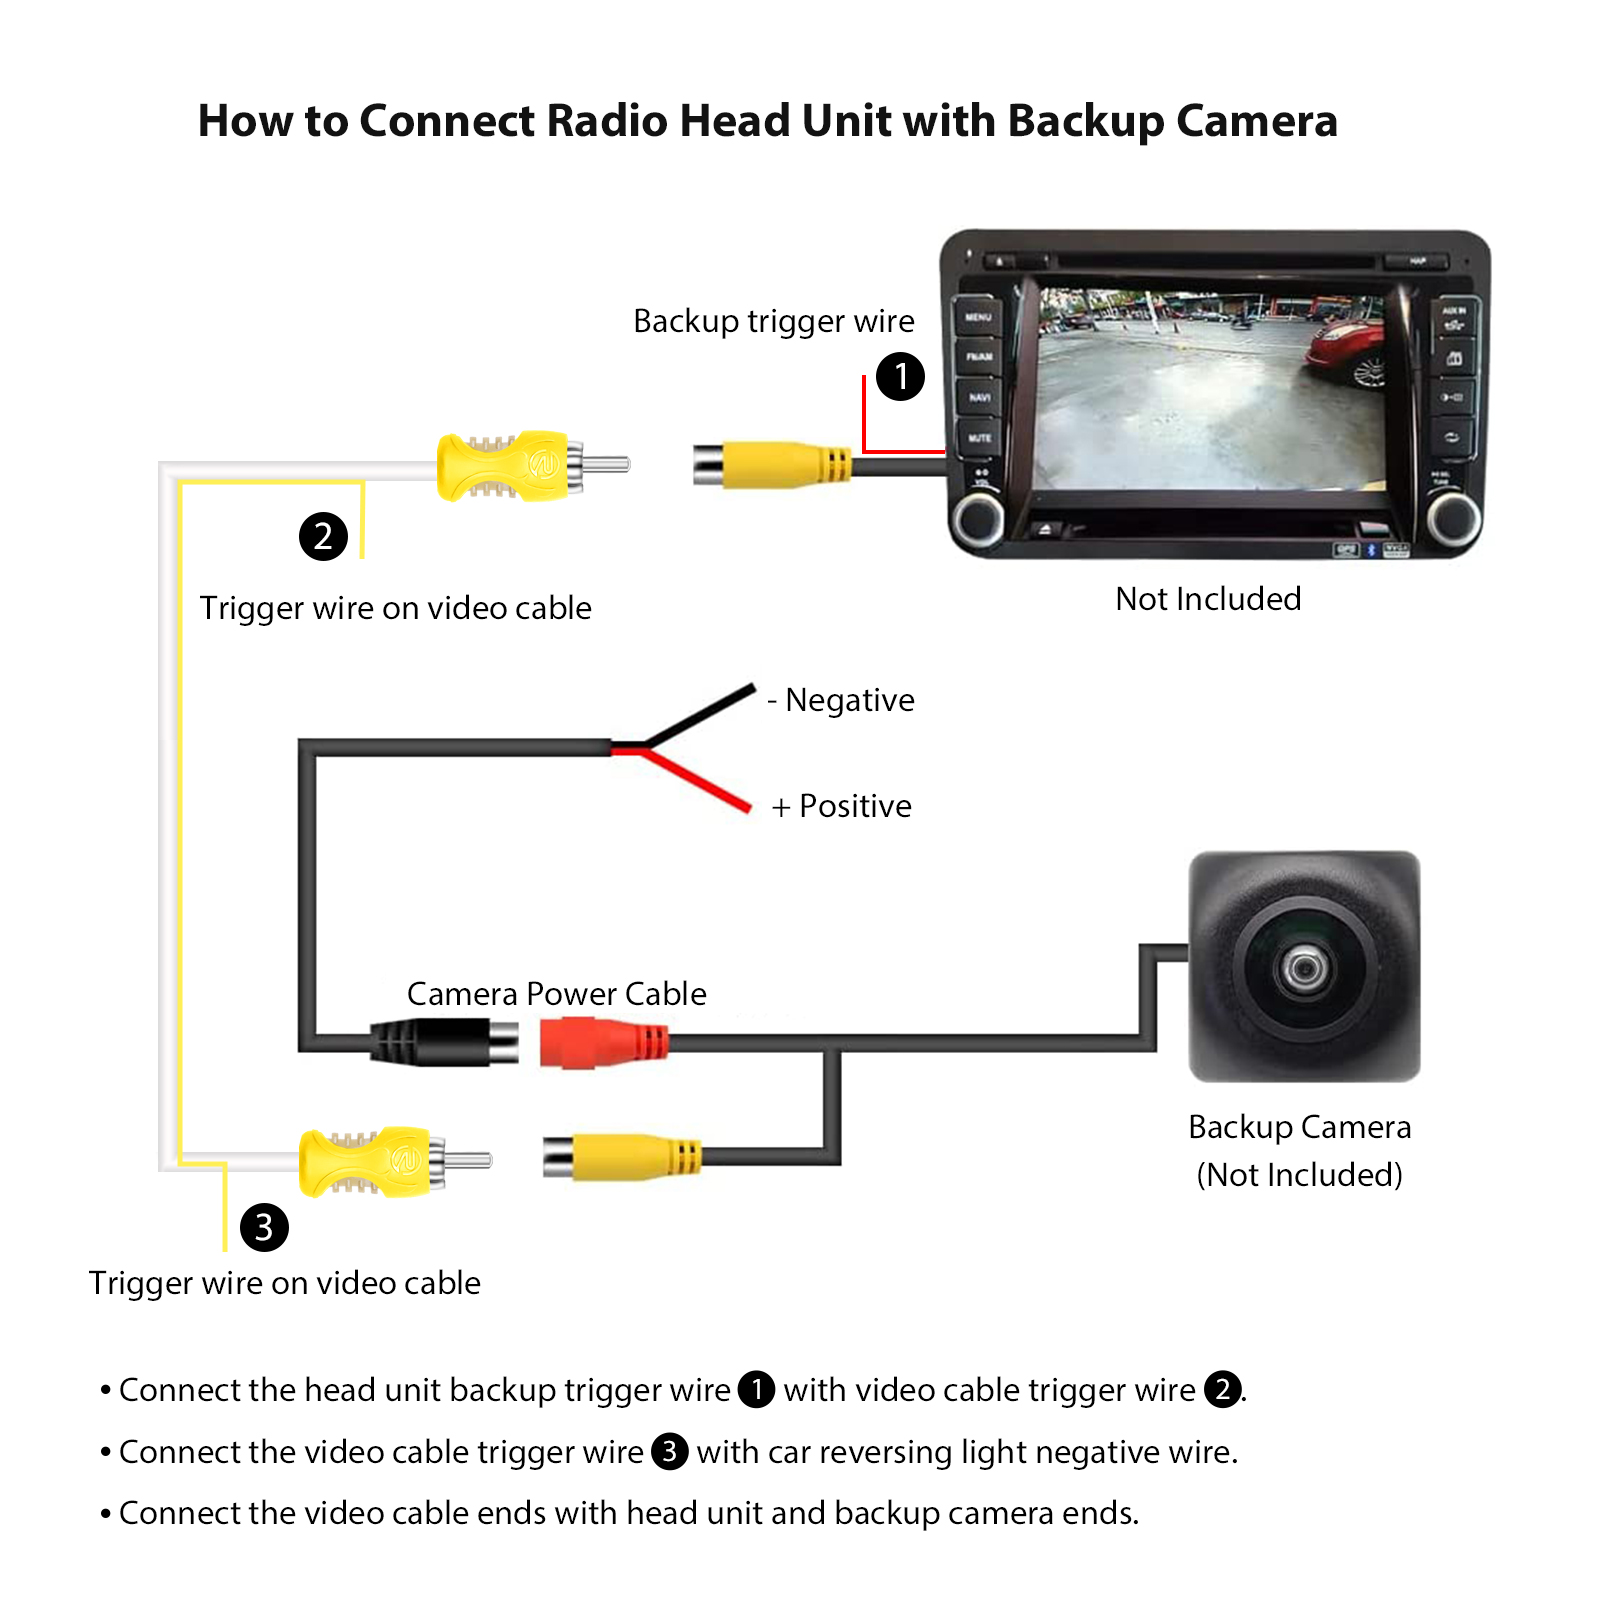
Connecting To The Display Monitor
Run the video cable from the camera to the display monitor inside your car. Hide the cable under the car’s trim or carpet for a clean look. Plug the video cable into the monitor’s video input port.
Connect the monitor’s power wires to your vehicle’s fuse box or accessory power source. This powers the display when the car is on. Use proper connectors and avoid loose wires.
Testing The Connections
Turn on your vehicle and shift into reverse gear. The backup camera should activate and show the rear view on the monitor. Check the image for clarity and adjust the camera angle if needed.
Inspect all wiring for loose connections or exposed wires. Fix any issues before finalizing the installation. A stable connection ensures reliable camera performance.
Troubleshooting Common Issues
Wiring a backup camera can sometimes lead to issues. Troubleshooting helps fix common problems fast. Understanding basic troubleshooting saves time and frustration. This section covers three main issues: no video display, flickering image, and power problems. Follow simple steps to solve these problems and get your camera working properly.
No Video Display
Check if the camera is connected to the monitor. Loose cables often cause no video display. Make sure the video cable plugs are secure and clean. Test the camera on another monitor to see if the problem is the monitor. Also, verify the monitor is on the correct input source. Sometimes, the camera might not get power. Check if the power wires are connected and the fuse is not blown.
Flickering Image
A flickering image usually means a bad connection. Inspect all video and power cables for damage or looseness. Replace any worn or broken cables. Interference from other electrical devices can cause flickering. Keep camera wires away from high-power cables or devices. Grounding issues may also cause flicker. Ensure the camera and monitor share a common ground connection.
Power Problems
The camera needs steady power to work well. Check the power source and wiring for faults. Use a multimeter to verify voltage at the camera. Replace blown fuses or reset circuit breakers if needed. Avoid using low-quality power adapters that can fail. Make sure the camera power wire connects to the right place, usually the reverse light circuit. This wiring ensures the camera turns on only when reversing.
Credit: adelaideepic.org
Tips For Maintenance And Upkeep
Maintaining your backup camera ensures clear visibility and reliable performance. Regular upkeep helps avoid common problems and extends the device’s life. Simple checks and cleaning keep the system working well. Follow these tips to keep your backup camera in top shape.
Cleaning The Camera Lens
Dirty lenses block the camera’s view. Clean the lens gently with a soft cloth. Use mild soap and water if needed. Avoid harsh chemicals that can damage the lens. Wipe the lens regularly to remove dust and dirt. Clear lenses improve image quality and safety.
Checking Wire Integrity
Check wires for cracks or loose connections. Damaged wires cause signal loss or failure. Look for wear caused by weather or movement. Secure loose wires with tape or clips. Replace any broken wires promptly. Good wiring ensures steady power and clear images.
Updating System Software
Camera software updates fix bugs and add features. Check the manufacturer’s website for updates. Follow instructions carefully to install new software. Updated software improves camera accuracy and compatibility. Regular updates help the system run smoothly.
Credit: recoilaudio.com
Frequently Asked Questions
What Tools Are Needed To Wire A Backup Camera?
You need a backup camera kit, wire strippers, electrical tape, a multimeter, and connectors. A drill may be required for mounting. These tools help ensure a safe and secure installation.
How Do I Connect The Backup Camera To Power?
Tap into the reverse light power wire using a wire tap connector. This powers the camera only when the vehicle is in reverse. Proper connection prevents battery drain and ensures functionality.
Can I Wire A Backup Camera Myself?
Yes, with basic electrical knowledge and the right tools, you can wire a backup camera. Follow the instructions carefully to avoid damage. DIY wiring saves money and allows customization.
Where Should I Mount The Backup Camera?
Mount the camera near the license plate or rear bumper center. Ensure a clear rear view without obstructions. Proper placement improves safety and camera performance.
Conclusion
Wiring a backup camera can be simple with the right steps. Take your time and follow each instruction carefully. Double-check connections for safety and proper function. A working backup camera improves your driving and parking. Trust the process and enjoy the added convenience.
Keep this guide handy for future reference. Stay safe on the road with clear rear vision.
As an Amazon Associate, I earn from qualifying purchases.
