
Are you setting up a new monitor but unsure where to plug it into your PC? Connecting your monitor correctly is key to getting the best picture and smooth performance.
If you plug it into the wrong port, you might face flickering screens, low resolution, or no display at all. Don’t worry—this guide will show you exactly where to connect your monitor on your computer. By the end, you’ll know the simple steps to get your screen up and running perfectly.
Keep reading to avoid common mistakes and make your setup hassle-free!

Credit: www.reddit.com
Monitor Connection Types
Choosing the right connection type to plug your monitor into a PC is important. Different ports offer different video quality and features. Knowing these options helps you pick the best one for your needs.
Hdmi Ports
HDMI is the most common monitor connection today. It carries both video and audio signals. Most modern PCs and monitors have HDMI ports. It supports high-definition video and sound with ease. HDMI cables are simple to use and widely available.
Displayport Options
DisplayPort is popular for high-performance monitors. It delivers high resolution and fast refresh rates. Many gaming and professional monitors use DisplayPort. It supports multiple monitors through one connection. DisplayPort offers better performance than HDMI in some cases.
Dvi Connections
DVI is an older digital connection. It provides good video quality but no audio. Many PCs and monitors still use DVI ports. It supports high-definition video but not as advanced as HDMI or DisplayPort. DVI is reliable for basic monitor setups.
Vga Legacy Ports
VGA is an old analog connection. It is common on very old PCs and monitors. VGA offers lower video quality compared to digital ports. It can show images but not in high definition. Use VGA only if no other option exists.
Usb-c And Thunderbolt
USB-C and Thunderbolt are newer connection types. They support video, audio, and data transfer in one cable. Many modern laptops use USB-C ports for monitors. Thunderbolt offers faster speeds and better performance. These ports simplify cable management and offer future-proofing.
Choosing The Right Port
Choosing the right port for your monitor is key to getting the best display quality. Your PC and monitor have different ports, so picking the correct one matters. It affects how clear and smooth your screen looks. Some ports handle higher resolution or faster refresh rates better than others. Also, the cable you use can change the picture quality. Let’s explore how to pick the right port for your setup.
Matching Monitor And Pc Ports
Check which ports your monitor and PC have. Common ports include HDMI, DisplayPort, DVI, and VGA. Match the same port type on both devices for easy connection. If ports differ, use an adapter but avoid it if possible. Native ports usually give better quality and fewer problems. HDMI and DisplayPort are the best choices for modern monitors.
Considering Resolution And Refresh Rate
Choose a port that supports your monitor’s resolution and refresh rate. Higher resolutions like 4K need ports with more bandwidth. DisplayPort and HDMI 2.0 or higher support 4K at 60Hz or more. Older ports like VGA or DVI might limit resolution or refresh speed. Picking the right port ensures smooth and sharp images.
Cable Quality And Length
Use a good quality cable to avoid signal loss or flickering. Cheap or damaged cables cause screen issues. Keep the cable length short to maintain strong signal strength. Long cables can lower image quality. Choose cables certified for your port type and resolution for the best results.
Connecting Multiple Monitors
Connecting multiple monitors to your PC can boost your productivity. It gives you more space to work, watch, or play. Many PCs and laptops support more than one screen. Understanding how to connect them is key for a smooth setup.
This section explains simple ways to connect multiple monitors. Learn about using your GPU ports, daisy chaining, and docking stations.
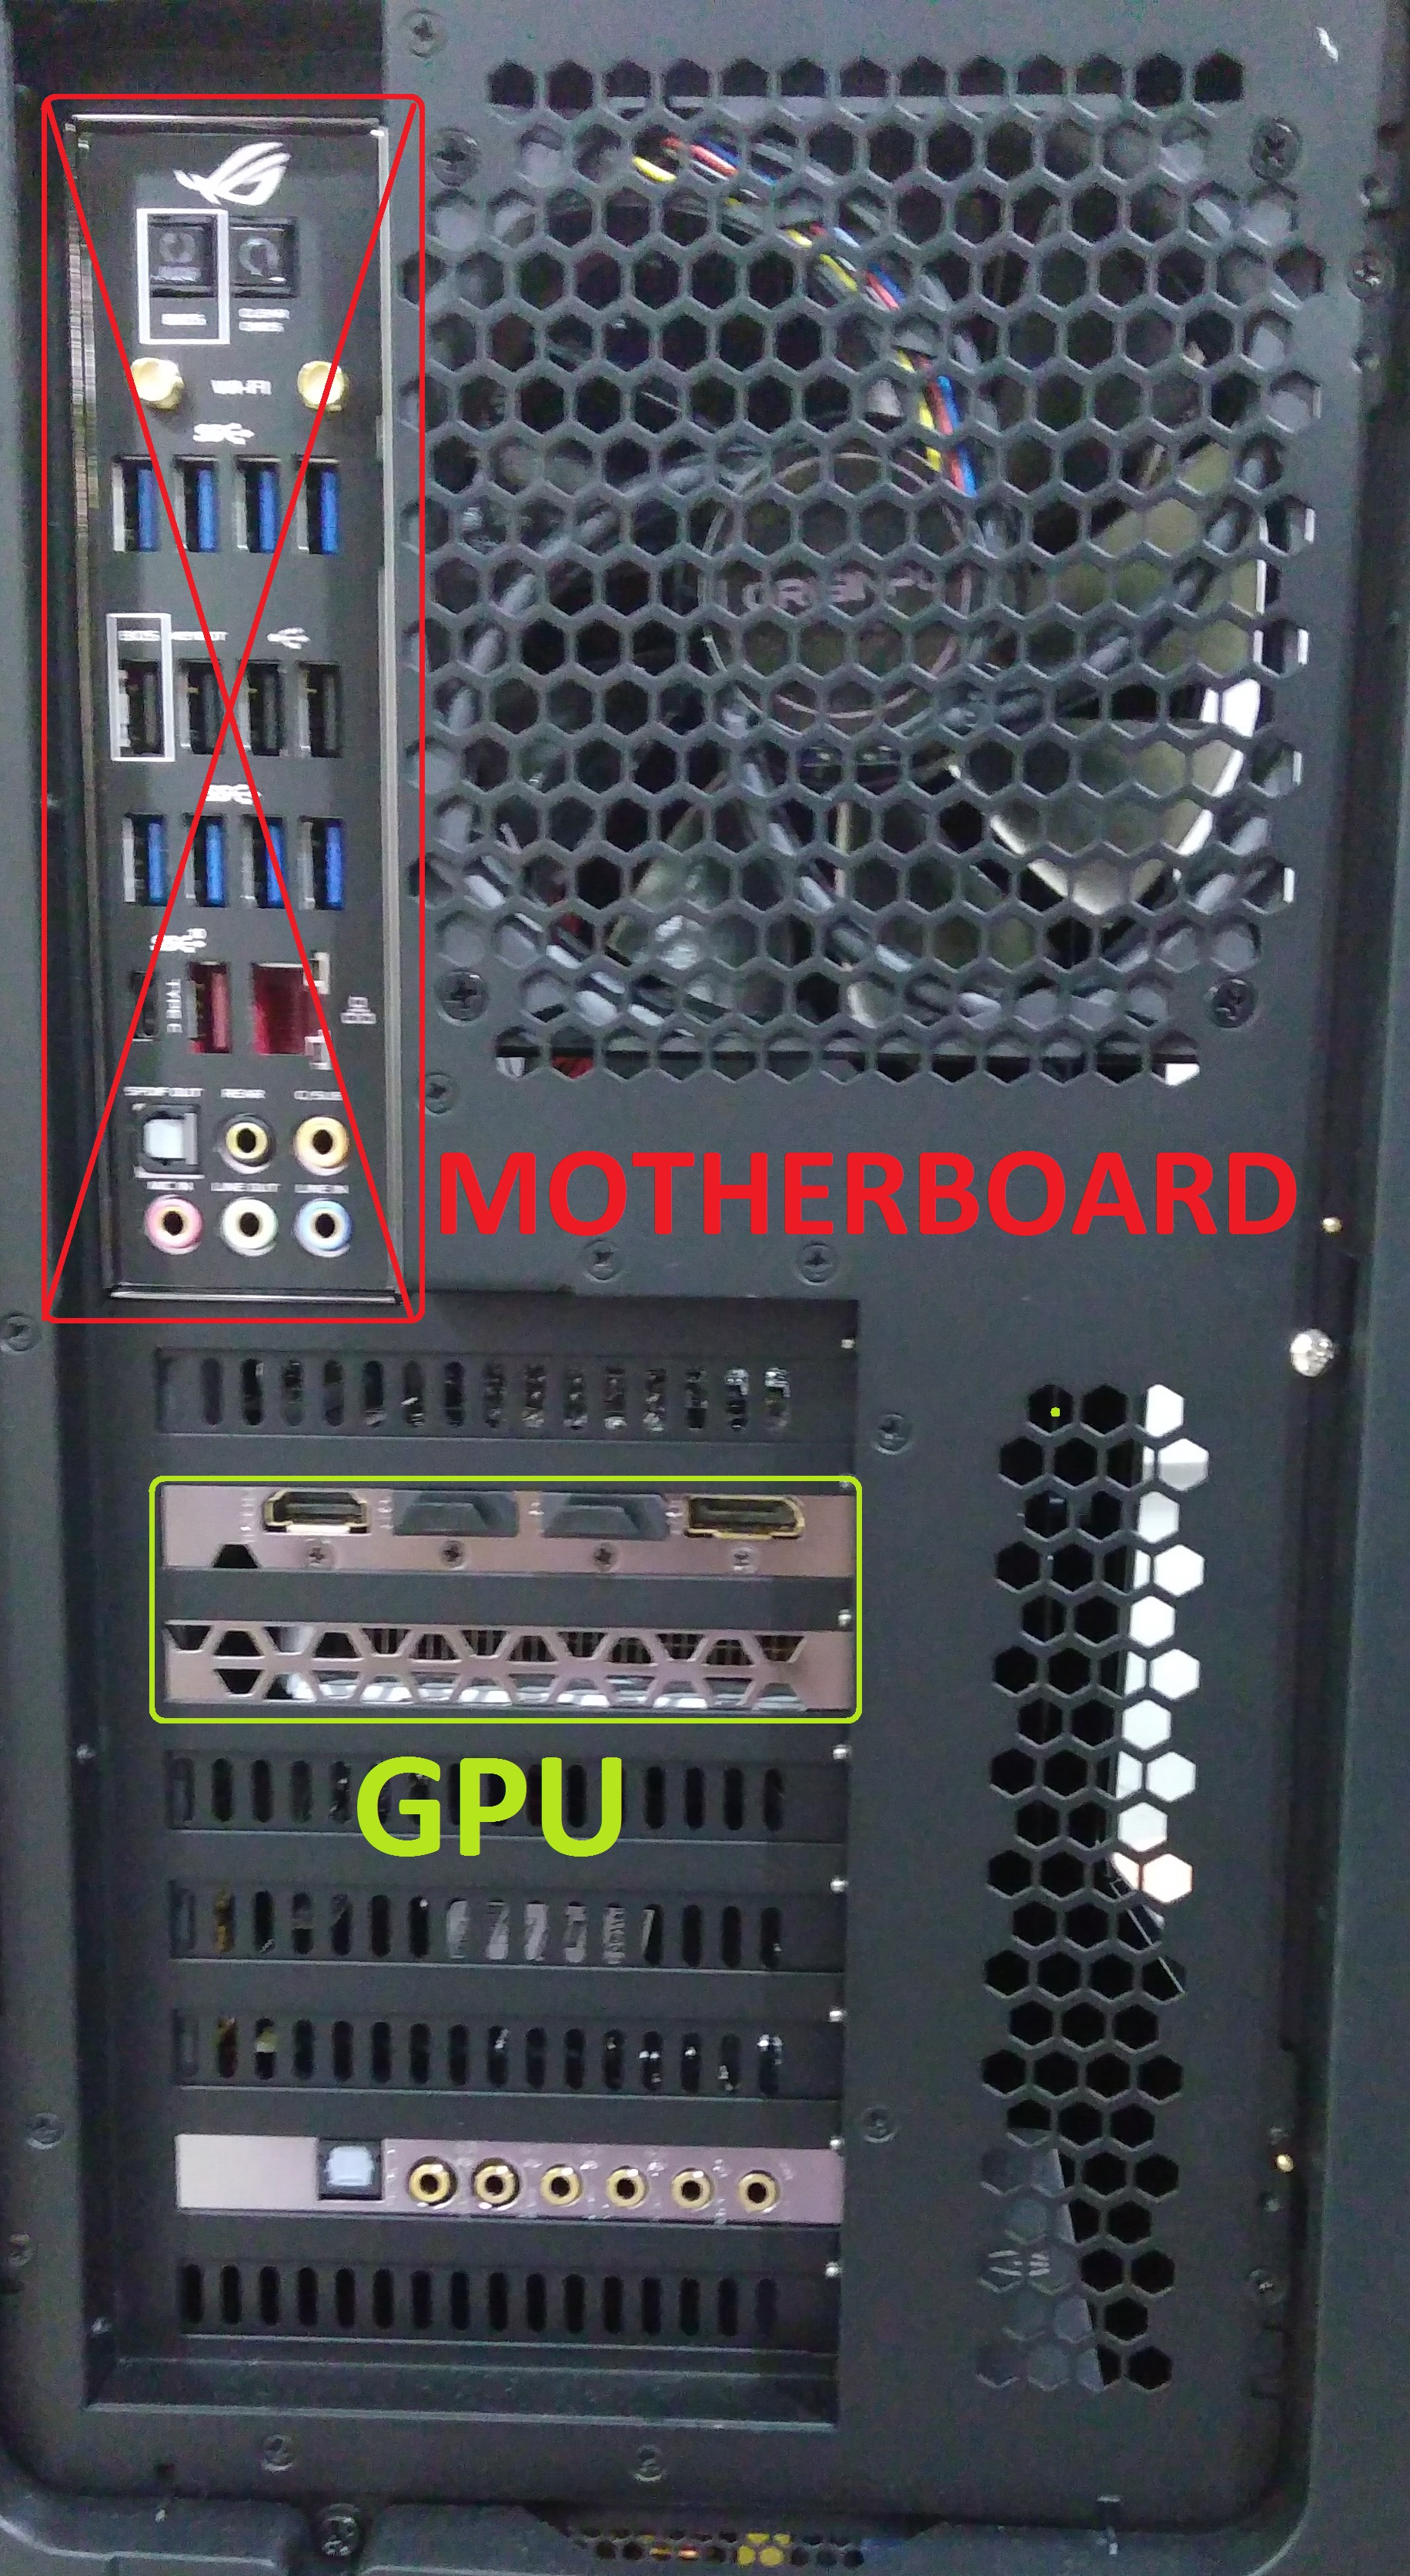
Using Multiple Ports On Gpu
Your graphics card has several output ports. Common types include HDMI, DisplayPort, and DVI. Connect each monitor to a separate port. This method is straightforward and reliable.
Check your GPU specifications for the number of supported monitors. Most modern GPUs support two or more displays. Use quality cables to avoid signal loss and flickering.
Daisy Chaining With Displayport
Daisy chaining links monitors using DisplayPort connections. Only some monitors support this feature. Connect the first monitor to the PC, then connect the second monitor to the first one.
This method reduces cable clutter. It works best with DisplayPort 1.2 or higher. Make sure your PC and monitors support Multi-Stream Transport (MST) for daisy chaining.
Using Docking Stations And Hubs
Docking stations and hubs expand your PC’s video outputs. They connect through USB-C or Thunderbolt ports. These devices allow multiple monitors on laptops with limited ports.
Choose a docking station that supports your monitor resolution and refresh rates. This option is great for clean desk setups and easy plug-and-play use.
Credit: support.originpc.com
Troubleshooting Connection Issues
Troubleshooting connection issues is a key step when your monitor does not display correctly. Problems can occur even if you plug the monitor into the right port. Simple checks can save time and fix most issues quickly. This section guides you through common problems and how to fix them.
No Signal Problems
No signal means the monitor does not receive any input from the PC. First, check if the monitor is turned on. Next, make sure the cable is connected to the correct port on both the PC and the monitor. Try switching to another port if available. Restart the PC to reset the connection. If the problem remains, test the monitor with another computer or use a different cable.
Incorrect Resolution Or Refresh Rate
The screen may look blurry or flicker if the resolution or refresh rate is wrong. Open your PC’s display settings and confirm the resolution matches the monitor’s native resolution. Set the refresh rate to a value supported by the monitor, usually 60Hz or higher. Lower or incorrect settings cause poor image quality. Adjust these settings until the display looks clear and stable.
Loose Or Damaged Cables
Loose or damaged cables cause intermittent or no display. Unplug and replug the cable firmly on both ends. Inspect the cable for bends, cuts, or frayed wires. Replace the cable if it looks damaged or worn out. Use high-quality cables that fit the ports properly. Avoid forcing cables into ports to prevent damage.
Optimizing Monitor Settings
Optimizing your monitor settings helps you get the best picture quality and comfort. Proper settings reduce eye strain and make your screen clearer. Small changes can improve how you see colors, brightness, and layout.
Adjusting these settings is simple and important for daily use. Let’s explore how to fine-tune your display for the best experience.
Adjusting Display Settings In Os
Open your computer’s display settings to start. Change the screen resolution to match your monitor’s native resolution. This makes images sharper and text easier to read. Adjust the scaling to make icons and fonts bigger or smaller.
Set the refresh rate to reduce flicker and eye strain. Higher refresh rates make movement smoother. Use the night mode or blue light filter for less eye fatigue in the evening.
Calibrating Color And Brightness
Adjust brightness so the screen is not too bright or too dark. Check contrast to make sure details are clear. Use built-in calibration tools in your OS for better color accuracy.
Calibrate colors to match real life or your preference. Balanced colors improve photo editing and video watching. Avoid overly bright or dull colors that can tire your eyes.
Setting Primary And Secondary Displays
Choose which monitor is your main display. The primary screen shows your taskbar and main windows. Secondary displays can extend your workspace or mirror the main screen.
Arrange displays in the settings to match their physical layout. This makes moving the mouse between screens natural. Use the right display for your main work and the other for extra tools or apps.

Credit: help.maingear.com
Frequently Asked Questions
Where Should I Plug My Monitor Into My Pc?
Plug your monitor into the PC’s dedicated video output port. Common ports include HDMI, DisplayPort, DVI, or VGA. Use the highest quality port available on both your PC and monitor for the best display performance.
Can I Use Any Port To Connect My Monitor?
Not all ports are equal. Use HDMI or DisplayPort for the best resolution and refresh rates. DVI and VGA are older and may offer lower quality. Always check your PC and monitor compatibility before connecting.
How Do I Identify The Correct Monitor Port On My Pc?
Look for labeled ports on the back or side of your PC. HDMI looks like a wide, flat port. DisplayPort has one angled corner. DVI is larger with many pinholes. VGA is a trapezoid with 15 holes.
Is It Okay To Use An Adapter For My Monitor Connection?
Yes, adapters can convert between HDMI, DisplayPort, DVI, and VGA. However, adapters might reduce video quality or limit resolution. Use a direct cable connection when possible to ensure the best display performance.
Conclusion
Choosing the right port to plug your monitor into your PC is simple. Use HDMI for the best video and audio quality. DisplayPort works well for high resolutions and fast refresh rates. VGA or DVI can still work on older devices.
Check your PC and monitor ports before connecting. Match the cables to avoid any confusion. This ensures a clear picture and smooth performance. Now, you can enjoy your screen without any hassle. Easy steps, better viewing.
As an Amazon Associate, I earn from qualifying purchases.

